
Image by Author | Canva
Have you ever thought about enhancing your favorite IDE by creating custom plugins? Plugins (or extensions) allow you to add custom functionality, streamline workflows, and improve the overall development experience. Whether you’re solving a problem unique to your team or creating something for the broader developer community, extensions empower you to extend the capabilities of the IDE. If you’re a developer who uses VS Code, you’re in luck—it’s straightforward to create and distribute plugins. This guide will walk you through building a functional VS Code extension from scratch.
Step-by-Step Guide to Creating an Extension for VS Code
Step 1: Set Up Your Environment
Install VS-Code and Node.js if you don’t already have it.
Step 2: Create a New Extension
- Open VS Code and run the following command in your terminal:
npm install --global yo generator-code
yo code
This installs Yeoman globally. If you face permission issues, do the following:
npx --package yo --package generator-code -- yo code
# ? What type of extension do you want to create? New Extension (TypeScript)
# ? What's the name of your extension? Timestamp Commentor
### Press  to choose default for all options below ###

# ? What's the identifier of your extension? timestamp-commentor
# ? What's the description of your extension? A plugin to add a timestamp comment at the end of files.
# ? Initialize a git repository? No
# ? Which bundler to use? unbundled
# ? Which package manager to use? npm
Step 3: Understand the Structure
The structure of the project, with each file’s purpose explained, is as follows:
timestamp-commentor/
 ├── .vscode/
 │     └── launch.json      # helps in debugging and running the extension in a
 │                            development host
 ├── node_modules/          # Dependencies installed via npm
 ├── out/                   # Compiled TypeScript files
 ├── src/
 │     └── extension.ts     # Main entry point for the extension which contains
 │                            logic for its functionality.
 ├── package.json           # Metadata and configuration for the extension
 ├── tsconfig.json          # TypeScript configuration
 └── README.md              # Documentation for the extension
Step 4: Implement Plugin Logic
- Open src/extension.ts and modify it as follows:
- The next step is to update package.json. Locate the “contributes” section and replace the “command” entry (currently “timestamp-commenter.helloWorld”) with the new identifier (“timestamp-commenter.addTimestamp”) and update the “title” to match the function (e.g., “Add Timestamp Comment”).
// The module 'vscode' contains the VS Code extensibility API
import * as vscode from 'vscode';

// This method is called when your extension is activated
// Your extension is activated the very first time the command is executed
export function activate(context: vscode.ExtensionContext) {

    // Log a message when the extension is activated
    console.log('Congratulations, your extension "timestamp-commentor" is now active!');

    // Register the "Add Timestamp Comment" command
    const addTimestampCommand = vscode.commands.registerCommand('extension.addTimestamp', () =>
        const editor = vscode.window.activeTextEditor;

        // Ensure there is an active editor
        if (editor)
            const document = editor.document;

            // Position the cursor at the end of the file
            const position = new vscode.Position(document.lineCount, 0);

            // Get the current date and time
            const now = new Date();
            const formattedDateTime = `// Last modified: $now.toLocaleString()`;

            // Insert the timestamp comment at the end of the file
            editor.edit(editBuilder =>
                editBuilder.insert(position, `\n$formattedDateTime`);
            );

            // Display a confirmation message
            vscode.window.showInformationMessage('Added timestamp comment.');
         else
            // Notify the user if no editor is active
            vscode.window.showErrorMessage('No active editor. Open a file to add a timestamp comment.');

    );

    // Push the command to the context's subscriptions
    context.subscriptions.push(addTimestampCommand);
}

// This method is called when your extension is deactivated
export function deactivate()
"contributes":
    "commands": [

            "command": "extension.addTimestamp",
            "title": "Add Timestamp Comment"

    ]
To make sure the extension is only activated when needed, add the activation event in the “activationEvents” section as follows:
"activationEvents": [
    "onCommand: extension.addTimestamp"
]
Step 5: Test the Extension
You need to test the extension to verify it works properly. For that:
- Press F5 or go to Run > Start Debugging from the menu. This starts a new instance of VS Code, called the Extension Development Host, specifically for testing your plugin.
- In the Extension Development Host, open or create any file.
- Open the Command Palette (Ctrl+Shift+P or Cmd+Shift+P on Mac), search for “Add Timestamp Comment” and execute it.
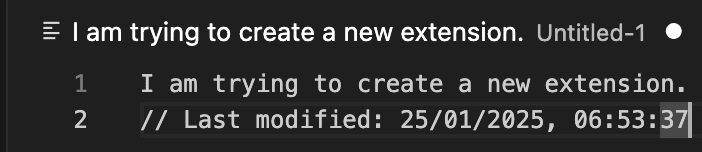
- A timestamp comment should appear at the end of the currently open file. For example, in my case, it appeared as:
Step 6: Edit The README.md
A README.md file is the documentation file for a project. It provides the information about the project, its features, how to use it, and any other relevant details. You need to edit it according to your extension. In Visual Studio Code, the overview section of your extension on the Marketplace directly reflects the content of the README.md file included in your project. Check the overview section of my extension to see what I have included in the README.md file.
Step 7. Package & Publish the Extension
- Create the Azure account, get a personal access token, and then create a publisher by following the instructions from this link.
- Add the publisher in the package.json file. You need to add it as:
- Use VSCE to package your extension by running the following command:
- After this, run the following command in your terminal:
- Now, publish the extension to the marketplace by running the following command:
In my case, the red box in the snapshot highlights the added publisher.

This generates a .visx distribution file.
In my case, it is:
It prompts you to enter the token. Paste the token you got in Step 1, and press enter.
The extension is published in the marketplace. You can install it by searching it in the extensions tab (Ctrl+Shift+X or Cmd+Shift+X) or going directly to this link.
Wrapping Up
In this article, you learned how to create an extension that adds a timestamp comment at the end of a file. Following the same steps, you can create any extension. I have also come across a useful YouTube tutorial to create and publish VS Code extensions. Check it too in case you feel stuck at any point. You can also reach out to me by dropping your questions in the comments section.
Kanwal Mehreen Kanwal is a machine learning engineer and a technical writer with a profound passion for data science and the intersection of AI with medicine. She co-authored the ebook “Maximizing Productivity with ChatGPT”. As a Google Generation Scholar 2022 for APAC, she champions diversity and academic excellence. She’s also recognized as a Teradata Diversity in Tech Scholar, Mitacs Globalink Research Scholar, and Harvard WeCode Scholar. Kanwal is an ardent advocate for change, having founded FEMCodes to empower women in STEM fields.