
Image by Author | Canva
In this tutorial, we will learn a little bit about FastAPI and use it to build an API for Machine Learning (ML) model inference. We will then use Jinja2 templates to create a proper web interface. This is a short but fun project that you can build on your own with limited knowledge about APIs and web development.
Our Top 3 Course Recommendations
![]()
![]() 1. Google Cybersecurity Certificate – Get on the fast track to a career in cybersecurity.
1. Google Cybersecurity Certificate – Get on the fast track to a career in cybersecurity.
![]()
![]() 2. Google Data Analytics Professional Certificate – Up your data analytics game
2. Google Data Analytics Professional Certificate – Up your data analytics game
![]()
![]() 3. Google IT Support Professional Certificate – Support your organization in IT
3. Google IT Support Professional Certificate – Support your organization in IT
What is FastAPI?
FastAPI is a popular and modern web framework used for building APIs with Python. It is designed to be fast and efficient, leveraging Python’s standard type hints to provide the best development experience. It is easy to learn and requires only a few lines of code to develop high-performance APIs. FastAPI is widely used by companies such as Uber, Netflix, and Microsoft to build APIs and applications. Its design makes it particularly suitable for creating API endpoints for machine learning model inference and testing. We can even build a proper web application by integrating Jinja2 templates.
Model Training
We will train the Random Forest classifier on the most popular Iris dataset. After training is complete, we will display model evaluation metrics and save the model in pickle format.
train_model.py:
from sklearn.datasets import load_iris
from sklearn.model_selection import train_test_split
from sklearn.ensemble import RandomForestClassifier
from sklearn.metrics import accuracy_score, classification_report
import joblib

# Load the iris dataset
iris = load_iris()
X, y = iris.data, iris.target

# Split the data into training and testing sets
X_train, X_test, y_train, y_test = train_test_split(
    X, y, test_size=0.2, random_state=42
)

# Train a RandomForest classifier
clf = RandomForestClassifier(n_estimators=100, random_state=42)
clf.fit(X_train, y_train)

# Evaluate the model
y_pred = clf.predict(X_test)
accuracy = accuracy_score(y_test, y_pred)
report = classification_report(y_test, y_pred, target_names=iris.target_names)

print(f"Model Accuracy: accuracy")
print("Classification Report:")
print(report)

# Save the trained model to a file
joblib.dump(clf, "iris_model.pkl")
Model Accuracy: 1.0
Classification Report:
              precision    recall  f1-score   support

      setosa       1.00      1.00      1.00        10
  versicolor       1.00      1.00      1.00         9
   virginica       1.00      1.00      1.00        11

    accuracy                           1.00        30
   macro avg       1.00      1.00      1.00        30
weighted avg       1.00      1.00      1.00        30
Building the ML API using the FastAPI
Next, we will install FastAPI and the Unicorn library, which we are going to use to build a model inference API.
$ pip install fastapi uvicorn
In the `app.py` file, we will:
- Load the saved model from the previous step.
- Create the Python class for inputs and prediction. Make sure you specify the dtype.
- Then, we will create the predict function and use the `@app.post` decorator. The decorator defines a POST endpoint at the URL path `/predict`. The function will be executed when a client sends a POST request to this endpoint.
- The predict function takes the values from the `IrisInput` class and returns them as the `IrisPrediction` class.
- Run the app using the `uvicorn.run` function and provide it with the host IP and port number as shown below.
app.py:
from fastapi import FastAPI
from pydantic import BaseModel
import joblib
import numpy as np
from sklearn.datasets import load_iris

# Load the trained model
model = joblib.load("iris_model.pkl")

app = FastAPI()


class IrisInput(BaseModel):
    sepal_length: float
    sepal_width: float
    petal_length: float
    petal_width: float


class IrisPrediction(BaseModel):
    predicted_class: int
    predicted_class_name: str


@app.post("/predict", response_model=IrisPrediction)
def predict(data: IrisInput):
    # Convert the input data to a numpy array
    input_data = np.array(
        [[data.sepal_length, data.sepal_width, data.petal_length, data.petal_width]]
    )

    # Make a prediction
    predicted_class = model.predict(input_data)[0]
    predicted_class_name = load_iris().target_names[predicted_class]

    return IrisPrediction(
        predicted_class=predicted_class, predicted_class_name=predicted_class_name
    )


if __name__ == "__main__":
    import uvicorn

    uvicorn.run(app, host="127.0.0.1", port=8000)
Run the Python file.
The FastAPI server is running, and we can access it by clicking on the link.
INFO:     Started server process [33828]
INFO:     Waiting for application startup.
INFO:     Application startup complete.
INFO:     Uvicorn running on http://127.0.0.1:8000 (Press CTRL+C to quit)
It will take us to the browsers with the index page. We have nothing on the index page, just on the `/predict` POST request. That’s why nothing is shown.

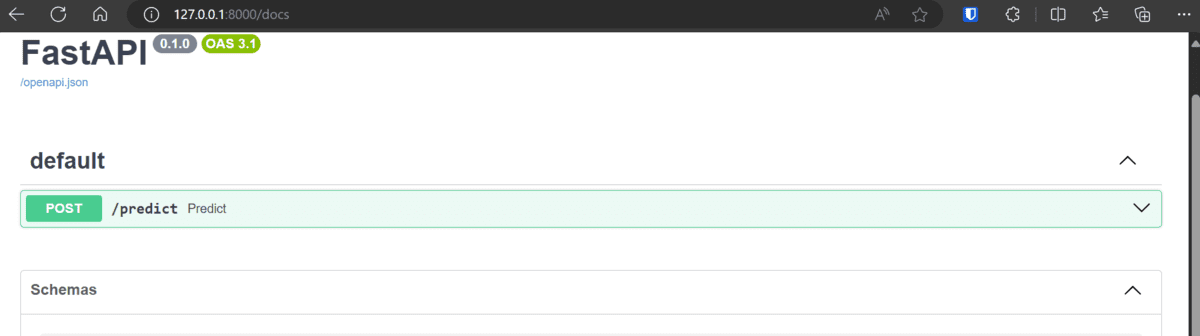
We can test our API by using the SwaggerUI interface. We can access it by adding “/docs” after the link.
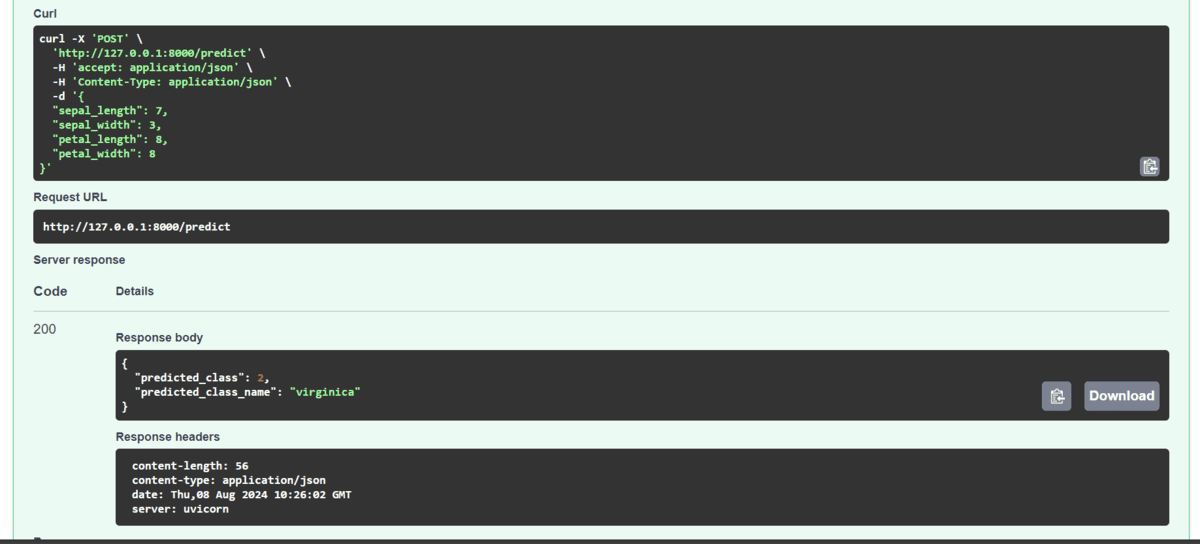
We can click the “/predict” option, edit the value, and run the prediction. In the end, we will get the response in the response body section. As we can see, we got “Virginica” as a result. We can test our model with direct values within the SwaggerUI and ensure it is working properly before deploying it to production.
Build a UI for the Web Application
Instead of using Swagger UI, we will create our own user interface that is simple and displays results like any other web application. To achieve this, we need to integrate Jinja2Templates within our app. Jinja2Templates allows us to build a proper web interface using HTML files, enabling us to customize various components of the webpage.
- Initiate Jinja2Templates by providing it the directory where HTML files will be.
- Define an asynchronous route that serves the “index.html” template as an HTML response for the root URL (“https://www.kdnuggets.com/”).
- Making changes to the input argument of the `predict` function using Request and Form.
- Defines an asynchronous POST endpoint “/predict” that accepts form data for iris flower measurements, uses a machine learning model to predict the iris species, and returns the prediction results rendered in “result.html” using TemplateResponse.
- The rest of the code is similar.
from fastapi import FastAPI, Request, Form
from fastapi.responses import HTMLResponse
from fastapi.templating import Jinja2Templates
from pydantic import BaseModel
import joblib
import numpy as np
from sklearn.datasets import load_iris

# Load the trained model
model = joblib.load("iris_model.pkl")

# Initialize FastAPI
app = FastAPI()

# Set up templates
templates = Jinja2Templates(directory="templates")


# Pydantic models for input and output data
class IrisInput(BaseModel):
    sepal_length: float
    sepal_width: float
    petal_length: float
    petal_width: float


class IrisPrediction(BaseModel):
    predicted_class: int
    predicted_class_name: str


@app.get("https://www.kdnuggets.com/", response_class=HTMLResponse)
async def read_root(request: Request):
    return templates.TemplateResponse("index.html", "request": request)


@app.post("/predict", response_model=IrisPrediction)
async def predict(
    request: Request,
    sepal_length: float = Form(...),
    sepal_width: float = Form(...),
    petal_length: float = Form(...),
    petal_width: float = Form(...),
):
    # Convert the input data to a numpy array
    input_data = np.array([[sepal_length, sepal_width, petal_length, petal_width]])

    # Make a prediction
    predicted_class = model.predict(input_data)[0]
    predicted_class_name = load_iris().target_names[predicted_class]

    return templates.TemplateResponse(
        "result.html",

            "request": request,
            "predicted_class": predicted_class,
            "predicted_class_name": predicted_class_name,
            "sepal_length": sepal_length,
            "sepal_width": sepal_width,
            "petal_length": petal_length,
            "petal_width": petal_width,
        ,
    )


if __name__ == "__main__":
    import uvicorn

    uvicorn.run(app, host="127.0.0.1", port=8000)
Next, we will create a directory named `templates` in the same directory as `app.py`. Inside the `templates` directory, create two HTML files: `index.html` and `result.html`.
If you are a web developer, you will easily understand the HTML code. For beginners, I will explain what is happening. This HTML code creates a web page with a form for predicting iris flower species. It allows users to input “Sepal” and “Petal” measurements and submit them via a POST request to the “/predict” endpoint.
index.html:
<!DOCTYPE html>

<html>

<head>

<title>Iris Flower Prediction</title>

</head>

<body>

<h1>Predict Iris Flower Species</h1>

<form action="/predict" method="post">

<label for="sepal_length">Sepal Length:</label>

<input type="number" step="any" id="sepal_length" name="sepal_length" required><br>

<label for="sepal_width">Sepal Width:</label>

<input type="number" step="any" id="sepal_width" name="sepal_width" required><br>

<label for="petal_length">Petal Length:</label>

<input type="number" step="any" id="petal_length" name="petal_length" required><br>

<label for="petal_width">Petal Width:</label>

<input type="number" step="any" id="petal_width" name="petal_width" required><br>

<button type="submit">Predict</button>

</form>

</body>

</html>
The `result.html` code defines a web page that displays the prediction results, showing the inputted sepal and petal measurements and the predicted iris species. It also displays the prediction class name with class ID and has a button that will take you to the index page.
result.html:
<!DOCTYPE html>

<html>

<head>

<title>Prediction Result</title>

</head>

<body>

<h1>Prediction Result</h1>

<p>Sepal Length:  sepal_length </p>

<p>Sepal Width:  sepal_width </p>

<p>Petal Length:  petal_length </p>

<p>Petal Width:  petal_width </p>

<h2>Predicted Class:  predicted_class_name  (Class ID:  predicted_class )</h2>

<a href="https://www.kdnuggets.com/">Predict Again</a>

</body>

</html>
Run the Python app file again.
INFO:     Started server process [2932]
INFO:     Waiting for application startup.
INFO:     Application startup complete.
INFO:     Uvicorn running on http://127.0.0.1:8000 (Press CTRL+C to quit)
INFO:     127.0.0.1:63153 - "GET / HTTP/1.1" 200 OK
When you click on the link, you won’t see the empty screen; instead, you will see the user interface where you can enter the “Sepal” and “Petal” length and width.

After clicking the “Predict” button, you will be taken to the next page, where the results will be displayed. You can click on the “Predict Again” button to test your model with different values.

All the source code, data, model, and information are available at the kingabzpro/FastAPI-for-ML GitHub repository. Please don’t forget to star ⭐ it.
Conclusion
Many large companies are now using FastAPI to create endpoints for their models, allowing them to deploy and integrate these models seamlessly across their systems. FastAPI is fast, easy to code, and comes with a variety of features that meet the demands of the modern data stack. The key to landing a job in this area is to build and document as many projects as possible. This will help you gain the experience and knowledge necessary for the initial screening sessions. Recruiters will evaluate your profile and portfolio to determine if you are a good fit for their team. So, why not start building projects using FastAPI today?
Abid Ali Awan (@1abidaliawan) is a certified data scientist professional who loves building machine learning models. Currently, he is focusing on content creation and writing technical blogs on machine learning and data science technologies. Abid holds a Master’s degree in technology management and a bachelor’s degree in telecommunication engineering. His vision is to build an AI product using a graph neural network for students struggling with mental illness.