
“Aurel’s Grand Theater” is an experimental, unconventional solo portfolio project that invites users to read case
studies, solve mysteries to unlock secret pages, or freely explore the theater – jumping around and even smashing
things!
I had an absolute blast working on it, even though it took much longer than I anticipated. Once I finally settled on a
creative direction, the project took about a year to complete – but reaching that direction took nearly two years on
its own. Throughout the journey, I balanced a full-time job as a lead web developer, freelance gigs, and an unexpected
relocation to the other side of the world. The cherry on top? I went through
way
too many artistic iterations. It ‘s my longest solo project to date, but also one of the most fun and creatively
rewarding. It gave me the chance to dive deep into creative coding and design.
This article takes you behind the scenes of the project – covering everything from design to code, including tools,
inspiration, project architecture, design patterns, and even feature breakdowns with code snippets you can adapt for
your own work.
The Creative Process: Behind the Curtain
Genesis
After eight years, my portfolio no longer reflected my skills or creativity. I wanted to create something unconventional – an experience where visitors become active participants rather than passive observers. Most importantly, I wanted it to be something I ‘d genuinely enjoy building. I was wrapping up “ Leap for Mankind” at the time and had a blast working on it, blending storytelling with game and interactive elements. I wanted to create another experimental website that combines game mechanics with a narrative experience.
From the beginning, I envisioned a small character that could freely explore its environment – smashing objects, interacting with surrounding elements, and navigating not just the floor but also vertical spaces by jumping onto tables and chairs. The goal was to transform the portfolio from a passive viewing experience into a fun, interactive one. At the same time, I recognized that some content demands clarity over creativity. For example, case studies require a more traditional format that emphasizes readability.
One of the key challenges, then, was designing a portfolio that could seamlessly transition between an immersive 3D game world and more conventional documentation pages – without disrupting the overall experience.
Building the Foundation
I had a general concept of the website in mind, so I started coding a proof of concept (POC) for the game back in
2022. In this early version, the player could move around, bump into objects, and jump – laying the foundation for the
interactive world I envisioned. Interestingly, much of the core code structure from that POC made it into the final
product. While the technical side was coming together, I still hadn ‘t figured out the artistic direction at that
point.
Trials and Errors
As a full-time web developer, I rarely find myself wrestling with artistic direction. Until now, every freelance and
side project I took on began with a clear creative vision that simply needed technical execution.
This time was different. At first, I leaned toward a cartoonish aesthetic with bold outlines, thinking it would
emphasize my creativity. I tried to convince myself it worked, but something felt off – especially when pairing the
visual style with the user interface. The disconnect between my vision and its execution was unfamiliar territory, and
it led me down a long and winding path of creative exploration.
I experimented with other styles too, like painterly visuals, which held promise but proved too time-consuming. Each
artistic direction felt either not suitable for me or beyond my practical capabilities as a developer moonlighting as
a designer.
The theater concept – which ultimately became central to the portfolio ‘s identity – arrived surprisingly late. It
wasn ‘t part of the original vision but surfaced only after countless iterations and discarded ideas. In total,
finding an artistic direction that truly resonated took nearly two years – a journey further complicated by a major
relocation across continents, ongoing work and freelance commitments, and personal responsibilities.
The extended timeline wasn ‘t due to technical complexity, but to an unexpected battle with creative identity. What
began as a straightforward portfolio refresh evolved into a deeper exploration of how to merge professional
presentation with personal expression – pushing me far beyond code and into the world of creative direction.
Tools & Inspiration: The Heart of Creation
After numerous iterations and abandoned concepts, I finally arrived at a creative direction that resonated with my
vision. Rather than detailing every artistic detour, I ‘ll focus on the tools and direction that ultimately led to the
final product.
Design Stack
Below is the stack I use to design my 3D projects:
UI/UX & Visual Design
-
Figma
: When I first started, everything was laid out in a Photoshop file. Over the years, I tried various design tools,
but I ‘ve been using Figma consistently since 2018 – and I ‘ve been really satisfied with it ever since. -
Miro
: reat for moodboarding and early ideation. It helps me visually organize thoughts and explore concepts during the
initial phase.
3D Modeling & Texturing
-
Blender
: My favorite tool for 3D modeling. It ‘s incredibly powerful and flexible, though it does have a steep learning
curve at first. Still, it ‘s well worth the effort for the level of creative control it offers. -
Adobe Substance 3D Painter
: The gold standard in my workflow for texture painting. It’s expensive, but the quality and precision it delivers
make it indispensable.
Image Editing
-
Krita
: I only need light photo editing, and Krita handles that perfectly without locking me into Adobe ‘s ecosystem – a
practical and efficient alternative.
Drawing Inspiration from Storytellers
While I drew inspiration from many sources, the most influential were Studio Ghibli and the mystical world of Harry
Potter. Ghibli ‘s meticulous attention to environmental detail shaped my understanding of atmosphere, while the
enchanting realism of the Harry Potter universe helped define the mood I wanted to evoke. I also browsed platforms
like ArtStation and Pinterest for broader visual inspiration, while sites like Behance, FWA, and Awwwards influenced
the more granular aspects of UX/UI design.
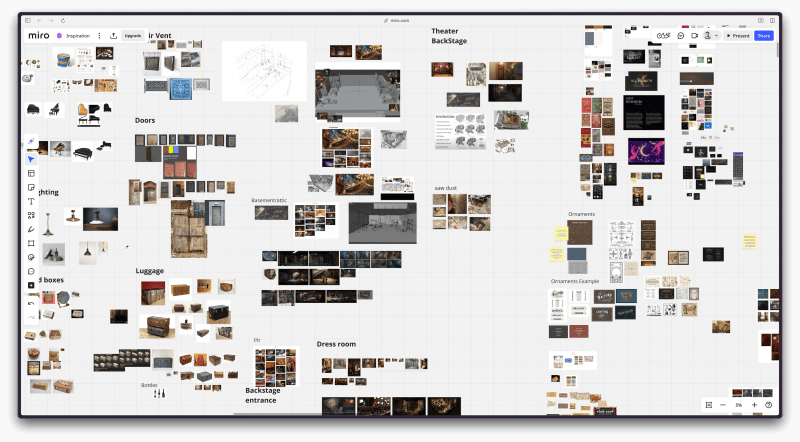
Initially, I organized these references on an InVision board. However, when the platform shut down mid-project, I had
to migrate everything to Miro – an unexpected transition and symbolic disruption that echoed the broader delays in the
project.
Designing the Theater
The theater concept emerged as the perfect metaphor for a portfolio: a space where different works could be presented
as “performances,” while maintaining a cohesive environment. It also aligned beautifully with the nostalgic,
pre-digital vibe inspired by many of my visual references.
Environment design is a specialized discipline I wasn ‘t very familiar with initially. To create a theater that felt
visually engaging and believable, I studied techniques from the
FZD School
. These approaches were invaluable in conceptualizing spaces that truly feel alive: places where you can sense people
living their lives, working, and interacting with the environment.
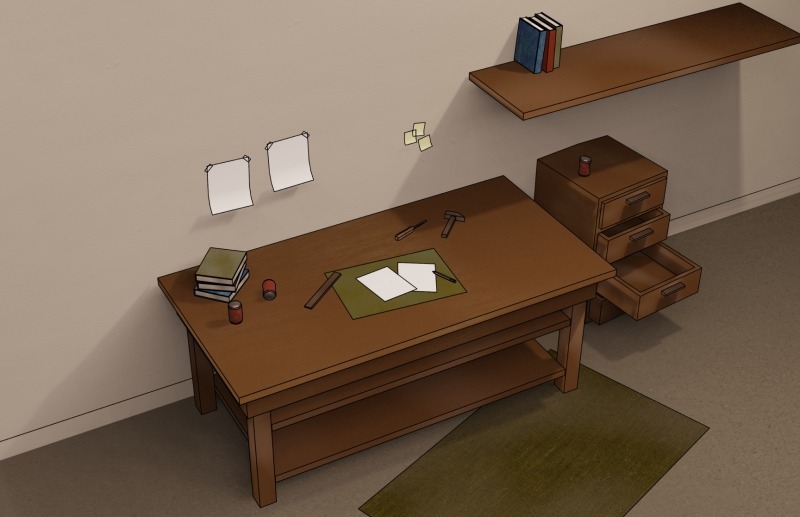
To make the environment feel genuinely inhabited, I incorporated details that suggest human presence: scattered props,
tools, theater posters, food items, pamphlets, and even bits of miscellaneous junk throughout the space. These
seemingly minor elements were crucial in transforming the static 3D model into a setting rich with history, mood, and
character.
The 3D Modeling Process
Optimizing for Web Performance
Creating 3D environments for the web comes with unique challenges that differ significantly from video modelling. When
scenes need to be rendered in real-time by a browser, every polygon matters.
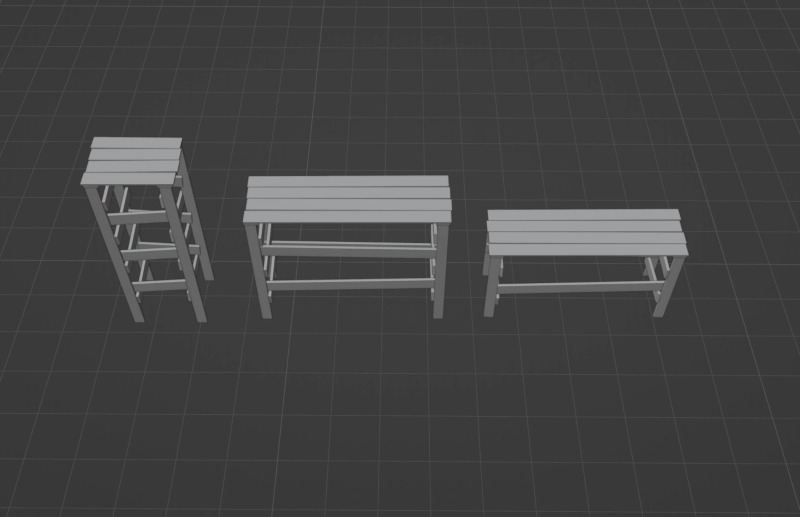
To address this, I adopted a strict low-poly approach and focused heavily on building reusable modular components.
These elements could be instantiated throughout the environment without duplicating unnecessary geometry or textures.
While the final result is still relatively heavy, this modular system allowed me to construct more complex and
detailed scenes while maintaining reasonable download sizes and rendering performance, which wouldn ‘t have been
possible without this approach.
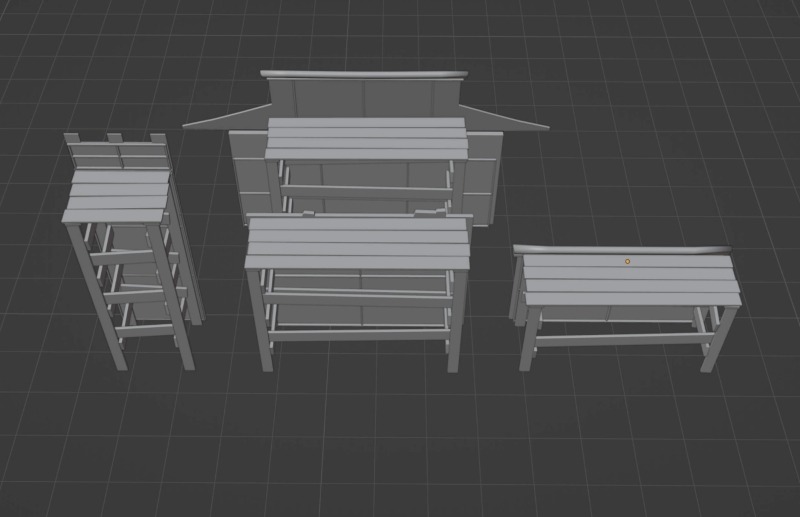
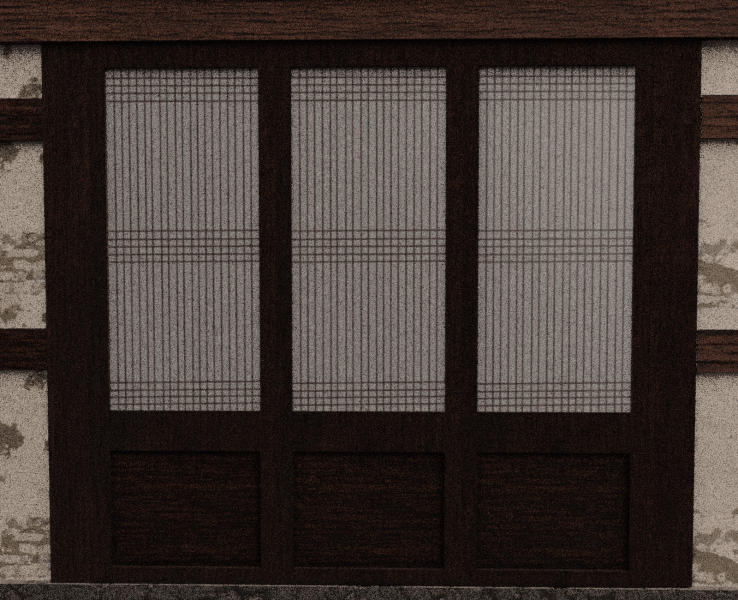
Texture Over Geometry
Rather than modeling intricate details that would increase polygon counts, I leveraged textures to suggest complexity.
Adobe Substance 3D became my primary tool for creating rich material surfaces that could convey detail without
overloading the renderer. This approach was particularly effective for elements like the traditional Hanok windows
with their intricate wooden lattice patterns. Instead of modeling each panel, which would have been
performance-prohibitive, I painted the details into textures and applied them to simple geometric forms.
Frameworks & Patterns: Behind the Scenes of Development
Tech Stack
This is a comprehensive overview of the technology stack I used for Aurel’s Grand Theater website, leveraging my
existing expertise while incorporating specialized tools for animation and 3D effects.
Core Framework
-
Vue.js
: While I previously worked with React, Vue has been my primary framework since 2018. Beyond simply enjoying and
loving this framework, it makes sense for me to maintain consistency between the tools I use at work and on my side
projects. I also use Vite and Pinia.
Animation & Interaction
-
GSAP
: A cornerstone of my development toolkit for nearly a decade, primarily utilized on this project for:- ScrollTrigger functionality
- MotionPath animations
- Timeline and tweens
-
As a personal challenge, I created my own text-splitting functionality for this project (since it wasn ‘t client
work), but I highly recommend GSAP ‘s SplitText for most use cases.
-
Lenis
: My go-to library for smooth scrolling. It integrates beautifully with scroll animations, especially when working
with Three.js.
3D Graphics & Physics
-
Three.js
: My favorite 3D framework and a key part of my toolkit since 2015. I enjoy using it to bring interactive 3D
elements to the web. -
Cannon.js
: Powers the site ‘s physics simulations. While I considered alternatives like Rapier, I stuck with Cannon.js since
it was already integrated into my 2022 proof-of-concept. Replacing it would have introduced unnecessary delays.
Styling
-
Queso
: A headless CSS framework developed at MamboMambo (my workplace). I chose it for its comprehensive starter
components and seamless integration with my workflow. Despite being in beta, it ‘s already reliable and flexible.
This tech stack strikes a balance between familiar tools and specialized libraries that enable the visual and
interactive elements that define the site’s experience.
Architecture
I follow Clean Code principles and other industry best practices, including aiming to keep my files small,
independent, reusable, concise, and testable.
I’ve also adopted the component folder architecture developed at my workplace. Instead of placing
Vue
files directly inside the
./components
directory, each component resides in its own folder. This folder contains the
Vue
file along with related types, unit tests, supporting files, and any child components.
Although initially designed for
Vue
components, I ‘ve found this structure works equally well for organizing logic with
Typescript
files,
utilities
,
directives
, and more. It ‘s a clean, consistent system that improves code readability, maintainability, and scalability.
MyFile
├── MyFile.vue
├── MyFile.test.ts
├── MyFile.types.ts
├── index.ts (export the types and the vue file)
├── data.json (optional files needed in MyFile.vue such as .json files)
│
├── components
│   ├── MyFileChildren
│   │   ├── MyFileChildren.vue
│   │   ├── MyFileChildren.test.ts
│   │   ├── MyFileChildren.types.ts
│   │   ├── index.ts
│   ├── MyFileSecondChildren
│   │   ├── MyFileSecondChildren.vue
│   │   ├── MyFileSecondChildren.test.ts
│   │   ├── MyFileSecondChildren.types.ts
│   │   ├── index.ts
The overall project architecture follows the high-level structure outlined below.
src/
├── assets/             # Static assets like images, fonts, and styles
├── components/         # Vue components
├── composables/        # Vue composables for shared logic
├── constant/           # Project wide constants
├── data/               # Project wide data files
├── directives/         # Vue custom directives
├── router/             # Vue Router configuration and routes
├── services/           # Services (e.g i18n)
├── stores/             # State management (Pinia)
├── three/
│   ├── Experience/
│   │   ├── Theater/                 # Theater experience
│   │   │   ├── Experience/          # Core experience logic
│   │   │   ├── Progress/            # Loading and progress management
│   │   │   ├── Camera/              # Camera configuration and controls
│   │   │   ├── Renderer/            # WebGL renderer setup and configuration
│   │   │   ├── Sources/             # List of resources
│   │   │   ├── Physics/             # Physics simulation and interactions
│   │   │   │   ├── PhysicsMaterial/ # Physics Material
│   │   │   │   ├── Shared/          # Physics for models shared across scenes
│   │   │   │   │   ├── Pit/         # Physics simulation and interactions
│   │   │   │   │   │   ├── Pit.ts   # Physics for models in the pit
│   │   │   │   │   │   ├── ...
│   │   │   │   ├── Triggers/         # Physics Triggers
│   │   │   │   ├── Scenes/           # Physics for About/Leap/Mont-Saint-Michel
│   │   │   │   │   ├── Leap/
│   │   │   │   │   │   ├── Leap.ts   # Physics for Leap For Mankind's models
│   │   │   │   │   │   ├── ...
│   │   │   │   │   └── ...
│   │   │   ├── World/               # 3D world setup and management
│   │   │   │   ├── World/           # Main world configuration and setup
│   │   │   │   ├── PlayerModel/     # Player character model and controls
│   │   │   │   ├── CameraTransition/ # Camera movement and transitions
│   │   │   │   ├── Environments/    # Environment setup and management
│   │   │   │   │   ├── Environment.ts # Environment configuration
│   │   │   │   │   └── types.ts     # Environment type definitions
│   │   │   │   ├── Scenes/          # Different scene configurations
│   │   │   │   │   ├── Leap/
│   │   │   │   │   │   ├── Leap.ts  # Leap For Mankind model's logic
│   │   │   │   │   └── ...
│   │   │   │   ├── Tutorial/        # Tutorial meshes & logic
│   │   │   │   ├── Bleed/           # Bleed effect logic
│   │   │   │   ├── Bird/            # Bird model logic
│   │   │   │   ├── Markers/         # Points of interest
│   │   │   │   ├── Shared/          # Models & meshes used across scenes
│   │   │   │   └── ...
│   │   │   ├── SharedMaterials/     # Reusable Three.js materials
│   │   │   └── PostProcessing/      # Post-processing effects
│   │   │
│   │   ├── Basement/                # Basement experience
│   │   ├── Idle/                    # Idle state experience
│   │   ├── Error404/                # 404 error experience
│   │   ├── Constant/                # Three.js related constants
│   │   ├── Factories/               # Three.js factory code
│   │   │   ├── RopeMaterialGenerator/
│   │   │   │   ├── RopeMaterialGenerator.ts
│   │   │   │   └── ...
│   │   │   ├── ...
│   │   ├── Utils/                   # Three.js utilities other reusable functions
│   │   └── Shaders/                 # Shaders programs
├── types/              # Project-wide TypeScript type definitions
├── utils/              # Utility functions and helpers
├── vendors/            # Third-party vendor code
├── views/              # Page components and layouts
├── workers/            # Web Workers
├── App.vue             # Root Vue component
└── main.ts             # Application entry point
This structured approach helps me manage the code base efficiently and maintain clear separation of concerns
throughout the codebase, making both development and future maintenance significantly more straightforward.
Design Patterns
Singleton
Singletons play a key role in this type of project architecture, enabling efficient code reuse without incurring
performance penalties.
import Experience from "@/three/Experience/Experience";
import type  Scene  from "@/types/three.types";

let instance: SingletonExample | null = null;

export default class SingletonExample
  private scene: Scene;
  private experience: Experience;

  constructor()
    if (instance)
      return instance;

    instance = this;

    this.experience = new Experience();
    this.scene = this.experience.scene;


  init()
    // initialize the singleton


  someMethod()
    // some method


  update()
    // update the singleton


  update10fps()
    // Optional: update methods capped at 10FPS


  destroySingleton()
    // clean up three.js + destroy the singleton
Split Responsibility Architecture
As shown earlier in the project architecture section, I deliberately separated physics management from model handling
to produce smaller, more maintainable files.
World Management Files:
These files are responsible for initializing factories and managing meshes within the main loop. They may also include
functions specific to individual world items.
Here’s an example of one such file:
// src/three/Experience/Theater/mockFileModel/mockFileModel.ts
import Experience from "@/three/Experience/Theater/Experience/Experience";

import type
  List,
  LoadModel
 from "@/types/experience/experience.types";
import type  Scene  from "@/types/three.types";
import type Physics from "@/three/Experience/Theater/Physics/Physics";
import type  Resources  from "@/three/Experience/Utils/Ressources/Resources";
import type  MaterialGenerator  from "@/types/experience/materialGeneratorType";


let instance: mockWorldFile | null = null;
export default class mockWorldFile
  private experience: Experience;
  private list: List;
  private physics: Physics;
  private resources: Resources;
  private scene: Scene;
  private materialGenerator: MaterialGenerator;
  public loadModel: LoadModel;
  constructor()
    //    Singleton
    if (instance)
      return instance;


    instance = this;

    this.experience = new Experience();
    this.scene = this.experience.scene;
    this.resources = this.experience.resources;
    this.physics = this.experience.physics;

    // factories
    this.materialGenerator = this.experience.materialGenerator;
    this.loadModel = this.experience.loadModel;

     // Most of the material are init in a file called sharedMaterials
    const bakedMaterial = this.experience.world.sharedMaterials.bakedMaterial;
    // physics infos such as position, rotation, scale, weight etc.
    const paintBucketPhysics = this.physics.items.paintBucket;

    // Array of objects of models. This will be used to update it's position, rotation, scale, etc.
    this.list =
      paintBucket: [],
      ...
    ;

    // get the resource file
    const resourcePaintBucket = this.resources.items.paintBucketWhite;

     //Reusable code to add models with physics to the scene. I will talk about that later.
    this.loadModel.setModels(
      resourcePaintBucket.scene,
      paintBucketPhysics,
      "paintBucketWhite",
      bakedMaterial,
      true,
      true,
      false,
      false,
      false,
      this.list.paintBucket,
      this.physics.mock,
      "metalBowlFalling",
    );


  otherMethod()
    ...


  destroySingleton()
    ...
Physics Management Files
These files trigger the factories to apply physics to meshes, store the resulting physics bodies, and update mesh
positions on each frame.
// src/three/Experience/Theater/pathTo/mockFilePhysics
import Experience from "@/three/Experience/Theater/Experience/Experience";

import additionalShape from "./additionalShape.json";

import type
  PhysicsResources,
  TrackName,
  List,
  modelsList
 from "@/types/experience/experience.types";
import type  cannonObject  from "@/types/three.types";
import type PhysicsGenerator from "../Factories/PhysicsGenerator/PhysicsGenerator";
import type UpdateLocation from "../Utils/UpdateLocation/UpdateLocation";
import type UpdatePositionMesh from "../Utils/UpdatePositionMesh/UpdatePositionMesh";
import type AudioGenerator from "../Utils/AudioGenerator/AudioGenerator";

let instance: MockFilePhysics | null = null;

export default class MockFilePhysics
  private experience: Experience;
  private list: List;
  private physicsGenerator: PhysicsGenerator;
  private updateLocation: UpdateLocation;
  private modelsList: modelsList;
  private updatePositionMesh: UpdatePositionMesh;
  private audioGenerator: AudioGenerator;

  constructor()
    //    Singleton
    if (instance)
      return instance;

    instance = this;

    this.experience = new Experience();
    this.debug = this.experience.debug;
    this.physicsGenerator = this.experience.physicsGenerator;
    this.updateLocation = this.experience.updateLocation;
    this.updatePositionMesh = this.experience.updatePositionMesh;
    this.audioGenerator = this.experience.audioGenerator;

    // Array of objects of physics. This will be used to update the model's position, rotation, scale etc.
    this.list =
      paintBucket: [],
    ;


  setModelsList()
    //When the load progress reaches a certain percentage, we can set the models list, avoiding some potential bugs or unnecessary conditional logic. Please note that the method update is never run until the scene is fully ready.
    this.modelsList = this.experience.world.constructionToolsModel.list;


  addNewItem(
    element: PhysicsResources,
    listName: string,
    trackName: TrackName,
    sleepSpeedLimit: number
Since the logic for updating mesh positions is consistent across the project, I created reusable code that can be
applied in nearly all physics-related files.
// src/three/Experience/Utils/UpdatePositionMesh/UpdatePositionMesh.ts

export default class UpdatePositionMesh
  updatePositionMesh(meshList: MeshList, physicList: PhysicList)
    for (let index = 0; index < physicList.length; index++)
      const physic = physicList[index];
      const model = meshList[index].model;

      model.position.set(
        physic.position.x,
        physic.position.y,
        physic.position.z
      );
      model.quaternion.set(
        physic.quaternion.x,
        physic.quaternion.y,
        physic.quaternion.z,
        physic.quaternion.w
      );
Factory Patterns
To avoid redundant code, I built a system around reusable code. While the project includes multiple factories, these
two are the most essential:
Model Factory
: LoadModel
With few exceptions, all models—whether instanced or regular, with or without physics—are added through this factory.
// src/three/Experience/factories/LoadModel/LoadModel.ts
import * as THREE from "three";
import Experience from "@/three/Experience/Theater/Experience/Experience";

import type
  PhysicsResources,
  TrackName,
  List,
  modelListPath,
  PhysicsListPath
 from "@/types/experience/experience.type";
import type  loadModelMaterial  from "./types";
import type  Material, Scene, Mesh  from "@/types/Three.types";
import type Progress from "@/three/Experience/Utils/Progress/Progress";
import type AddPhysicsToModel from "@/three/Experience/factories/AddPhysicsToModel/AddPhysicsToModel";

let instance: LoadModel | null = null;


export default class LoadModel
  public experience: Experience;
  public progress: Progress;
  public mesh: Mesh;
  public addPhysicsToModel: AddPhysicsToModel;
  public scene: Scene;


  constructor()
    if (instance)
      return instance;

    instance = this;

    this.experience = new Experience();
    this.scene = this.experience.scene;
    this.progress = this.experience.progress;
    this.addPhysicsToModel = this.experience.addPhysicsToModel;


  async setModels(
    model: Model,
    list: PhysicsResources[],
    physicsList: string,
    bakedMaterial: LoadModelMaterial,
    isCastShadow: boolean = false,
    isReceiveShadow: boolean = false,
    isIntancedModel: boolean = false,
    isDoubleSided: boolean = false,
    modelListPath: ModelListPath,
    physicsListPath: PhysicsListPath,
    trackName: TrackName = null,
    sleepSpeedLimit: number
Physics Factory: PhysicsGenerator
This factory has a single responsibility: creative physics properties for meshes.
// src/three/Experience/Utils/PhysicsGenerator/PhysicsGenerator.ts
import Experience from "@/three/Experience/Theater/Experience/Experience";
import * as CANNON from "cannon-es";

import CannonUtils from "@/utils/cannonUtils.js";

import type
  Quaternion,
  PhysicsItemPosition,
  PhysicsItemType,
  PhysicsResources,
  TrackName,
  CannonObject,
 from "@/types/experience/experience.types";

import type  Scene, ConvexGeometry  from "@/types/three.types";
import type Progress from "@/three/Experience/Utils/Progress/Progress";
import type AudioGenerator from "@/three/Experience/Utils/AudioGenerator/AudioGenerator";
import type Physics from "@/three/Experience/Theater/Physics/Physics";
import type  physicsShape  from "./PhysicsGenerator.types"

let instance: PhysicsGenerator | null = null;

export default class PhysicsGenerator  null = null
  )
    const setSpeedLimit = sleepSpeedLimit ?? 0.15;

    // For this project I needed to detect if the user was in the Mont-Saint-Michel, Leap For Mankind, About or Archives scene.
    const localCurrentScene = source.locations[this.currentScene]
      ? this.currentScene
      : "about";

    switch (source.type as physicsShape)
      case "box":
        const boxShape = new CANNON.Box(new CANNON.Vec3(...source.shape));
        const boxBody = new CANNON.Body(
          mass: source.mass,
          position: new CANNON.Vec3(
            source.locations[localCurrentScene].position.x,
            source.locations[localCurrentScene].position.y,
            source.locations[localCurrentScene].position.z
          ),
          allowSleep: allowSleep,
          shape: boxShape,
          material: source.material
            ? source.material
            : this.physics.physics.defaultMaterial,
          sleepSpeedLimit: setSpeedLimit,
        );

        source.locations[localCurrentScene].quaternion
          && (boxBody.quaternion.y =
              source.locations[localCurrentScene].quaternion.y);

        this.physics.physics.addBody(boxBody);
        this.updatedLoadedItem();

        // Add optional SFX that will be played if the item collides with another physics item
        trackName
          && this.audioGenerator.addEventListenersToObject(boxBody, TrackName);

        return boxBody;


      // Then it's basicly the same logic for all other cases
      case "sphere":
        ...


      case "cylinder":
       ...


      case "plane":
       ...


      case "trigger":
      ...


      case "torus":
        ...


      case "trimesh":
       ...


      case "polyhedron":
        ...


      default:
        ...
        break;


  updatedLoadedItem()
    this.progress.addLoadedPhysicsItem(); // Update the number of item loaded (physics only)


  //#endregion add physics to an object

  // other

  destroySingleton()
    ...
FPS Capping
With over 100 models and approximately 150 physics items loaded in the main scene, Aurel’s Grand Theater required
performance-driven coding from the outset.
I were to rebuild the project today, I would leverage GPU computing much more intensively. However, when I started the
proof of concept in 2022, GPU computing for the web was still relatively new and not fully mature—at least, that was
my perception at the time. Rather than recoding everything, I worked with what I had, which also presented a great
personal challenge. In addition to using low-poly models and employing classic optimization techniques, I extensively
used instanced meshes for all small, reusable items—even those with physics. I also relied on many other
under-the-hood techniques to keep the performance as smooth as possible on this CPU-intensive website.
One particularly helpful approach I implemented was adaptive frame rates. By capping the FPS to different levels (60,
30, or 10), depending on whether the logic required rendering at those rates, I optimized performance. After all, some
logic doesn ‘t require rendering every frame. This is a simple yet effective technique that can easily be incorporated
into your own project.
Now, let ‘s take a look at the file responsible for managing time in the project.
// src/three/Experience/Utils/Time/Time.ts
import * as THREE from "three";
import EventEmitter from "@/three/Experience/Utils/EventEmitter/EventEmitter";

let instance: Time | null = null;
let animationFrameId: number | null = null;
const clock = new THREE.Clock();

export default class Time extends EventEmitter
  private lastTick60FPS: number = 0;
  private lastTick30FPS: number = 0;
  private lastTick10FPS: number = 0;

  private accumulator60FPS: number = 0;
  private accumulator30FPS: number = 0;
  private accumulator10FPS: number = 0;

  public start: number = 0;
  public current: number = 0;
  public elapsed: number = 0;
  public delta: number = 0;
  public delta60FPS: number = 0;
  public delta30FPS: number = 0;
  public delta10FPS: number = 0;

  constructor()
    if (instance)
      return instance;

    super();
    instance = this;


  tick()
    const currentTime: number = clock.getElapsedTime() * 1000;

    this.delta = currentTime - this.current;
    this.current = currentTime;

    // Accumulate the time that has passed
    this.accumulator60FPS += this.delta;
    this.accumulator30FPS += this.delta;
    this.accumulator10FPS += this.delta;

    // Trigger uncapped tick event using the project's EventEmitter class
    this.trigger("tick");

    // Trigger 60FPS tick event
    if (this.accumulator60FPS >= 1000 / 60)
      this.delta60FPS = currentTime - this.lastTick60FPS;
      this.lastTick60FPS = currentTime;

      // Same logic as "this.trigger("tick")" but for 60FPS
      this.trigger("tick60FPS");
      this.accumulator60FPS -= 1000 / 60;


    // Trigger 30FPS tick event
    if (this.accumulator30FPS >= 1000 / 30)
      this.delta30FPS = currentTime - this.lastTick30FPS;
      this.lastTick30FPS = currentTime;

      this.trigger("tick30FPS");
      this.accumulator30FPS -= 1000 / 30;


    // Trigger 10FPS tick event
    if (this.accumulator10FPS >= 1000 / 10)
      this.delta10FPS = currentTime - this.lastTick10FPS;
      this.lastTick10FPS = currentTime;

      this.trigger("tick10FPS");
      this.accumulator10FPS -= 1000 / 10;


    animationFrameId = window.requestAnimationFrame(() =>
      this.tick();
    );
Then, in the
Experience.ts
file, we simply place the methods according to the required FPS.
constructor()
   if (instance)
      return instance;


    ...

    this.time = new Time();

    ...


    //  The game loops (here called tick) are updated when the EventEmitter class is triggered.
    this.time.on("tick", () =>
      this.update();
    );
    this.time.on("tick60FPS", () =>
      this.update60();
    );
    this.time.on("tick30FPS", () =>
      this.update30();
    );
    this.time.on("tick10FPS", () =>
      this.update10();
    );


  update()
    this.renderer.update();


  update60()
    this.camera.update60FPS();
    this.world.update60FPS();
    this.physics.update60FPS();


  update30()
    this.physics.update30FPS();
    this.world.update30FPS();


  update10()
    this.physics.update10FPS();
    this.world.update10FPS();
Selected Feature Breakdown: Code & Explanation
Cinematic Page Transitions: Return Animation Effects
Inspired by techniques from the film industry, the transitions between the 3D game and the more traditionally
structured pages, such as the Case Studies, About, and Credits pages, were carefully designed to feel seamless and
cinematic.
The first-time visit animation provides context and immerses users into the website experience. Meanwhile, the other
page transitions play a crucial role in ensuring a smooth shift between the game and the more conventional layout of
the Case Studies and About page, preserving immersion while naturally guiding users from one experience to the next.
Without these transitions, it would feel like abruptly jumping between two entirely different worlds.
I’ll do a deep dive into the code for the animation when the user returns from the basement level. It’s a bit simpler
than the other cinematic transitions but the underlying logic is the same, which makes it easier for you to adapt it
to another project.
Here the base file:
// src/three/Experience/Theater/World/CameraTransition/CameraIntroReturning.ts

import  Vector3, CatmullRomCurve3  from "three";
import Experience from "@/three/Experience/Theater/Experience/Experience";
import  DebugPath  from "@/three/Experience/Utils/DebugPath/DebugPath";

import  createSmoothLookAtTransition  from "./cameraUtils";
import  setPlayerPosition  from "@/three/Experience/Utils/playerPositionUtils";

import  gsap  from "gsap";
import  MotionPathPlugin  from "gsap/MotionPathPlugin";

import
  CAMERA_POSITION_SEAT,
  PLAYER_POSITION_RETURNING,
 from "@/three/Experience/Constant/PlayerPosition";

import type  Debug  from "@/three/Experience/Utils/Debugger/types";
import type  Scene, Camera  from "@/types/three.types";


const DURATION_RETURNING_FORWARD = 5;
const DURATION_LOOKAT_RETURNING_FORWARD = 4;
const RETURNING_PLAYER_QUATERNION = [0, 0, 0, 1];
const RETURNING_PLAYER_CAMERA_FINAL_POSITION = [
  7.3927162062108955, 3.4067893207543367, 4.151297331541345,
];
const RETURNING_PLAYER_ROTATION = -0.3;
const RETURNING_PLAYER_CAMERA_FINAL_LOOKAT = [
  2.998858990830107, 2.5067893207543412, -1.55606797749978944,
];

gsap.registerPlugin(MotionPathPlugin);

let instance: CameraIntroReturning | null = null;

export default class CameraIntroReturning
  private scene: Scene;
  private experience: Experience;
  private timelineAnimation: GSAPTimeline;
  private debug: Debug;
  private debugPath: DebugPath;
  private camera: Camera;
  private lookAtTransitionStarted: boolean = false;

  constructor()
    if (instance)
      return instance;

    instance = this;

    this.experience = new Experience();
    this.scene = this.experience.scene;
    this.debug = this.experience.debug;

    this.timelineAnimation = gsap.timeline(
      paused: true,
      onComplete: () =>
        this.timelineAnimation.clear().kill();
      ,
    );

  init()
    this.camera = this.experience.camera.instance;
    this.initPath();


  initPath()
    ...


  initTimeline()
    ...


  createSmoothLookAtTransition(
   ...


  setPositionPlayer()
   ...


  playAnimation()
   ...


  ...

  destroySingleton()
   ...

}
The
init
method, called from another file, initiates the creation of the animation. At first, we set the path for the
animation, then the timeline.
init()
    this.camera = this.experience.camera.instance;
    this.initPath();


initPath()
  // create the path for the camera
  const pathPoints = new CatmullRomCurve3([
    new Vector3(CAMERA_POSITION_SEAT[0], CAMERA_POSITION_SEAT[1], 15),
    new Vector3(5.12, 4, 8.18),
    new Vector3(...RETURNING_PLAYER_CAMERA_FINAL_POSITION),
  ]);

  // init the timeline
  this.initTimeline(pathPoints);


initTimeline(path: CatmullRomCurve3)
 ...
The timeline animation is split into two: a) The camera moves vertically from the basement to the theater, above the
seats.
...

initTimeline(path: CatmullRomCurve3)
    // get the points
    const pathPoints = path.getPoints(30);

    // create the gsap timeline
    this.timelineAnimation
      // set the initial position
      .set(this.camera.position,
        x: CAMERA_POSITION_SEAT[0],
        y: CAMERA_POSITION_SEAT[1] - 3,
        z: 15,
      )
      .add(() =>
        this.camera.lookAt(3.5, 1, 0);
      )
      //   Start the animation! In this case the camera is moving from the basement to above the seat
      .to(this.camera.position,
        x: CAMERA_POSITION_SEAT[0],
        y: CAMERA_POSITION_SEAT[1],
        z: 15,
        duration: 3,
        ease: "elastic.out(0.1,0.1)",
      )
      .to(
        this.camera.position,

		      ...
        ,
      )
      ...
b) The camera follows a path while smoothly transitioning its view to the final location.
 .to(
    this.camera.position,

      // then we use motion path to move the camera to the player behind the raccoon
      motionPath:
        path: pathPoints,
        curviness: 0,
        autoRotate: false,
      ,
      ease: "power1.inOut",
      duration: DURATION_RETURNING_FORWARD,
      onUpdate: function ()
        const progress = this.progress();

        // wait until progress reaches a certain point to rotate to the camera at the player LookAt
        if (
          progress >=
            1 -
              DURATION_LOOKAT_RETURNING_FORWARD /
                DURATION_RETURNING_FORWARD &&
          !this.lookAtTransitionStarted
        )
	         this.lookAtTransitionStarted = true;

           // Create a new Vector3 to store the current look direction
           const currentLookAt = new Vector3();

            // Get the current camera's forward direction (where it's looking)
            instance!.camera.getWorldDirection(currentLookAt);

            // Extend the look direction by 100 units and add the camera's position
            // This creates a point in space that the camera is currently looking at
            currentLookAt.multiplyScalar(100).add(instance!.camera.position);

            // smooth lookAt animation
	          createSmoothLookAtTransition(
	            currentLookAt,
	            new Vector3(...RETURNING_PLAYER_CAMERA_FINAL_LOOKAT),
	            DURATION_LOOKAT_RETURNING_FORWARD,
	            this.camera
	          );

      ,
    ,
  )
  .add(() =>
    // animation is completed, you can add some code here
  );
As you noticed, I used a utility function called
smoothLookAtTransition
since I needed this functionality in multiple places.
import type  Vector3  from "three";
import  gsap  from "gsap";

import type  Camera  from "@/types/three.types";

export const createSmoothLookAtTransition = (
  from: Vector3,
  to: Vector3,
  duration: number,
  camera: Camera,
  ease: string = "power2.out",
) =>
  const lookAtPosition =  x: from.x, y: from.y, z: from.z ;
  return gsap.to(lookAtPosition,
    x: to.x,
    y: to.y,
    z: to.z,
    duration,
    ease: ease,
    onUpdate: () =>
      camera.lookAt(lookAtPosition.x, lookAtPosition.y, lookAtPosition.z);
    ,
  );
;
With everything ready, the animation sequence is run when
playAnimation()
is triggered.
playAnimation()
    // first set the position of the player
    this.setPositionPlayer();
    // then play the animation
    this.timelineAnimation.play();


  setPositionPlayer()
   // an simple utils to update the position of the player when the user land in the scene, return or switch scene.
    setPlayerPosition(this.experience,
      position: PLAYER_POSITION_RETURNING,
      quaternion: RETURNING_PLAYER_QUATERNION,
      rotation: RETURNING_PLAYER_ROTATION,
    );
Scroll-Triggered Animations: Showcasing Books on About Pages
While the game is fun and filled with details, the case studies and about pages are crucial to the overall experience,
even though they follow a more standardized format. These pages still have their own unique appeal. They are filled
with subtle details and animations, particularly scroll-triggered effects such as split text animations when
paragraphs enter the viewport, along with fade-out effects on SVGs and other assets. These animations create a vibe
that mirrors the mysterious yet intriguing atmosphere of the game, inviting visitors to keep scrolling and exploring.
While I can’t cover every animation in detail, I ‘d like to share the technical approach behind the book animations
featured on the about page. This effect blends DOM scroll event tracking with a Three.js scene, creating a seamless
interaction between the user ‘s scrolling behavior and the 3D-rendered books. As visitors scroll down the page, the
books transition elegantly and respond dynamically to their movement.
Before we dive into the
Three.js
file, let ‘s look into the
Vue
component.
//src/components/BookGallery/BookGallery.vue
<template>
  <!-- the ID is used in the three.js file -->
  <div class="book-gallery" id="bookGallery" ref="bookGallery"></div>
</template>

<script setup lang="ts">
import  onBeforeUnmount, onMounted, onUnmounted, ref  from "vue";

import gsap from "gsap";
import  ScrollTrigger  from "gsap/ScrollTrigger";

import type  BookGalleryProps  from "./types";

gsap.registerPlugin(ScrollTrigger);

const props = withDefaults(defineProps<BookGalleryProps>(), );

const bookGallery = ref<HTMLBaseElement | null>(null);

const setupScrollTriggers = () =>
 ...
;

const triggerAnimation = (index: number) =>
  ...
;

onMounted(() =>
  setupScrollTriggers();
);

onUnmounted(() =>
  ...
);
</script>

<style lang="scss" scoped>
.book-gallery
  position: relative;
  height: 400svh; // 1000svh * 4 books

</style>
Thresholds are defined for each book to determine which one will be active – that is, the book that will face the
camera.
const setupScrollTriggers = () =>
  if (!bookGallery.value) return;

  const galleryHeight = bookGallery.value.clientHeight;
  const scrollThresholds = [
    galleryHeight * 0.15,
    galleryHeight * (0.25 + (0.75 - 0.25) / 3),
    galleryHeight * (0.25 + (2 * (0.75 - 0.25)) / 3),
    galleryHeight * 0.75,
  ];

  ...
;
Then I added some
GSAP
magic by looping through each threshold and attaching scrollTrigger to it.
const setupScrollTriggers = () =>

	...

	scrollThresholds.forEach((threshold, index) =>
	    ScrollTrigger.create(
	      trigger: bookGallery.value,
	      markers: false,
	      start: `top+=$threshold center`,
	      end: `top+=$galleryHeight * 0.5 bottom`,
	      onEnter: () =>
	        triggerAnimation(index);
	      ,
	      onEnterBack: () =>
	        triggerAnimation(index);
	      ,
	      once: false,
	    );
	  );
;
On scroll, when the user enters or re-enters a section defined by the thresholds, a function is triggered within a
Three.js
file.
const triggerAnimation = (index: number) =>
  window.experience?.world?.books?.createAnimation(index);
;
Now let ‘s look at
Three.js
file:
// src/three/Experience/Basement/World/Books/Books.ts

import * as THREE from "three";
import Experience from "@/three/Experience/Basement/Experience/Experience";

import  SCROLL_RATIO  from "@/constant/scroll";

import  gsap  from "gsap";

import type  Book  from "./books.types";
import type  Material, Scene, Texture, ThreeGroup  from "@/types/three.types";
import type  Sizes  from "@/three/Experience/Utils/Sizes/types";
import type LoadModel from "@/three/Experience/factories/LoadModel/LoadModel";
import type MaterialGenerator from "@/three/Experience/factories/MaterialGenerator/BasicMaterialGenerator";
import type Resources from "@/three/Experience/Utils/Ressources/Resources";

const GSAP_EASE = "power2.out";
const GSAP_DURATION = 1;
const NB_OF_VIEWPORTS_BOOK_SECTION = 5;

let instance: Books | null = null;

export default class Books
  public scene: Scene;
  public experience: Experience;
  public resources: Resources;
  public loadModel: LoadModel;
  public sizes: Sizes;

  public materialGenerator: MaterialGenerator;
  public resourceDiffuse: Texture;
  public resourceNormal: Texture;
  public bakedMaterial: Material;

  public startingPostionY: number;
  public originalPosition: Book[];
  public activeIndex: number = 0;
  public isAnimationRunning: boolean = false;

  public bookGalleryElement: HTMLElement
When the file is initialized, we set up the textures and positions of the books.
init()
  this.initModels();
  this.findPosition();
  this.setBookSectionHeight();
  this.initBooks();


initModels()
  this.originalPosition = [

      name: "book1",
      meshName: null, // the name of the mesh from Blender will dynamically be written here
      position:  x: 0, y: -0, z: 20 ,
      rotation:  x: 0, y: Math.PI / 2.2, z: 0 , // some rotation on y axis so it looks more natural when the books are pilled
    ,

      name: "book2",
      meshName: null,
      position:  x: 0, y: -0.25, z: 20 ,
      rotation:  x: 0, y: Math.PI / 1.8, z: 0 ,
    ,

      name: "book3",
      meshName: null,
      position:  x: 0, y: -0.52, z: 20 ,
      rotation:  x: 0, y: Math.PI / 2, z: 0 ,
    ,

      name: "book4",
      meshName: null,
      position:  x: 0, y: -0.73, z: 20 ,
      rotation:  x: 0, y: Math.PI / 2.3, z: 0 ,
    ,
  ];

  this.resourceDiffuse = this.resources.items.bookDiffuse;
  this.resourceNormal = this.resources.items.bookNormal;

    // a reusable class to set the material and normal map
  this.bakedMaterial = this.materialGenerator.setStandardMaterialAndNormal(
    this.resourceDiffuse,
    this.resourceNormal
  );


//#region position of the books

// Finds the initial position of the book gallery in the DOM
findPosition()
  this.bookGalleryElement = document.getElementById("bookGallery");

  if (this.bookGalleryElement)
    const rect = this.bookGalleryElement.getBoundingClientRect();
    this.startingPostionY = (rect.top + window.scrollY) / 200;


//  Sets the height of the book section based on viewport and scroll ratio
setBookSectionHeight()
  this.bookSectionHeight =
    this.sizes.height * NB_OF_VIEWPORTS_BOOK_SECTION * SCROLL_RATIO;


//#endregion position of the books
Each book mesh is created and added to the scene as a
THREE.Group
.
init()
  ...
  this.initBooks();


...

initBooks()
  this.booksGroup = new THREE.Group();
  this.scene.add(this.booksGroup);

  this.originalPosition.forEach((position, index) =>
    this.initBook(index, position);
  );


initBook(index: number, position: Book)
  const bookModel = this.experience.resources.items[position.name].scene;
  this.originalPosition[index].meshName = bookModel.children[0].name;

  //Reusable code to set the models. More details under the Design Parterns section
  this.loadModel.addModel(
    bookModel,
    this.bakedMaterial,
    false,
    false,
    false,
    true,
    true,
    2,
    true
  );

  this.scene.add(bookModel);

  bookModel.position.set(
    position.position.x,
    position.position.y - this.startingPostionY,
    position.position.z
  );

  bookModel.rotateY(position.rotation.y);
  bookModel.scale.set(10, 10, 10);
  this.booksGroup.add(bookModel);
Each time a book
enters
or
reenters
its thresholds, the triggers from the
Vue
file run the animation
createAnimation
in this file, which rotates the active book in front of the camera and stacks the other books into a pile.
...

createAnimation(activeIndex: number) {
    if (!this.originalPosition) return;

    this.originalPosition.forEach((item: Book) =>
      const bookModel = this.scene.getObjectByName(item.meshName);
      if (bookModel)
        gsap.killTweensOf(bookModel.rotation);
        gsap.killTweensOf(bookModel.position);

    );
    this.toggleIsAnimationRunning(true);

    this.activeIndex = activeIndex;
    this.originalPosition.forEach((item: Book, index: number) => {
      const bookModel = this.scene.getObjectByName(item.meshName);

      if (bookModel)
        if (index === activeIndex)
          gsap.to(bookModel.rotation,
            x: Math.PI / 2,
            z: Math.PI / 2.2,
            y: 0,
            duration: 2,
            ease: GSAP_EASE,
            delay: 0.3,
            onComplete: () =>
              this.toggleIsAnimationRunning(false);
            ,
          );
          gsap.to(bookModel.position,
            y: 0,
            duration: GSAP_DURATION,
            ease: GSAP_EASE,
            delay: 0.1,
          );
         else
        // pile unactive book
          gsap.to(bookModel.rotation,
            x: 0,
            y: 0,
            z: 0,
            duration: GSAP_DURATION - 0.2,
            ease: GSAP_EASE,
          );

          const newYPosition = activeIndex < index ? -0.14 : +0.14;

          gsap.to(bookModel.position,
            y: newYPosition,
            duration: GSAP_DURATION,
            ease: GSAP_EASE,
            delay: 0.1,
          );


    });
  }


  toggleIsAnimationRunning(bool: boolean)
    this.isAnimationRunning = bool;
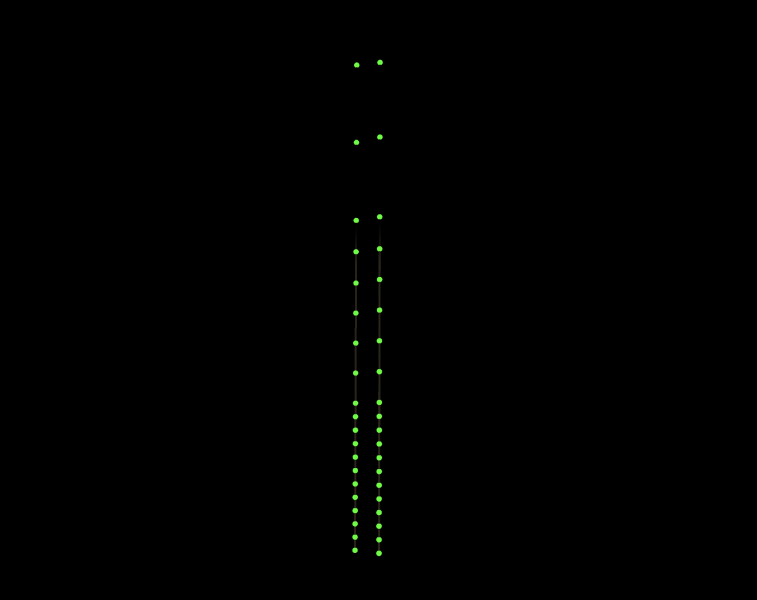
Interactive Physics Simulations: Rope Dynamics
The game is the main attraction of the website. The entire concept began back in 2022, when I set out to build a small
mini-game where you could jump on tables and smash things and it was my favorite part to work on.
Beyond being fun to develop, the interactive physics elements make the experience more engaging, adding a whole new
layer of excitement and exploration that simply isn’t possible in a flat, static environment.
While I can ‘t possibly cover all the physics-related elements, one of my favorites is the rope system near the menu.
It’s a subtle detail, but it was one of the first things I coded when I started leaning into a more theatrical,
artistic direction.
The ropes were also built with performance in mind—optimized to look and behave convincingly without dragging down the
framerate.
This is the base file for the meshes:
// src/three/Experience/Theater/World/Theater/Rope/RopeModel.ts

import * as THREE from "three";
import Experience from "@/three/Experience/Theater/Experience/Experience";
import RopeMaterialGenerator from "@/three/Experience/Factories/MaterialGenerator/RopeMaterialGenerator";

import ropesLocation from "./ropesLocation.json";

import type  Location, List  from "@/types/experience/experience.types";
import type  Scene, Resources, Physics, RopeMesh, CurveQuad  from "@/types/three.types";

let instance: RopeModel | null = null;

export default class RopeModel
  public scene: Scene;
  public experience: Experience;
  public resources: Resources;
  public physics: Physics;
  public material: Material;
  public list: List;
  public ropeMaterialGenerator: RopeMaterialGenerator;

  public ropeLength: number = 20;
  public ropeRadius: number = 0.02;
  public ropeRadiusSegments: number = 8;

  constructor()
    //    Singleton
    if (instance)
      return instance;

    instance = this;

    this.experience = new Experience();
    this.scene = this.experience.scene;
    this.resources = this.experience.resources;
    this.physics = this.experience.physics;
    this.ropeMaterialGenerator = new RopeMaterialGenerator();

    this.ropeLength = this.experience.physics.rope.numberOfSpheres

  initRope()
   ...


  createRope()
    ...


  setArrayOfVertor3()
    ...


  setYValues()
    ...


  setMaterial()
    ...


  addRopeToScene()
    ...


  //#region update at 60FPS
  update()
   ...


  updateLineGeometry()
   ...

  //#endregion update at 60FPS

  destroySingleton()
    ...
Mesh creation is initiated inside the constructor.
// src/three/Experience/Theater/World/Theater/Rope/RopeModel.ts

 constructor()
	...
    this.initRope();


  initRope()
    // Generate the material that will be used for all ropes
    this.setMaterial();

    // Create a rope at each location specified in the ropesLocation configuration
    ropesLocation.forEach((location) =>
      this.createRope(location);
    );


  createRope(location: Location)
    // Generate the curve that defines the rope's path
    const curveQuad = this.setArrayOfVertor3();
    this.setYValues(curveQuad);

    const tube = new THREE.TubeGeometry(
      curveQuad,
      this.ropeLength,
      this.ropeRadius,
      this.ropeRadiusSegments,
      false
    );

    const rope = new THREE.Mesh(tube, this.material);

    rope.geometry.attributes.position.needsUpdate = true;

    // Add the rope to the scene and set up its physics. I'll explain it later.
    this.addRopeToScene(rope, location);


  setArrayOfVertor3()
    const arrayLimit = this.ropeLength;
    const setArrayOfVertor3 = [];
    // Create points in a vertical line, spaced 1 unit apart
    for (let index = 0; index < arrayLimit; index++)
      setArrayOfVertor3.push(new THREE.Vector3(10, 9 - index, 0));
      if (index + 1 === arrayLimit)
        return new THREE.CatmullRomCurve3(
          setArrayOfVertor3,
          false,
          "catmullrom",
          0.1
        );


  setYValues(curve: CurveQuad)
    // Set each point's Y value to its index, creating a vertical line
    for (let i = 0; i < curve.points.length; i++)
      curve.points[i].y = i;


  setMaterial()
	  ...
Since the rope texture is used in multiple places, I use a factory pattern for efficiency.
...

setMaterial()
    this.material = this.ropeMaterialGenerator.generateRopeMaterial(
      "rope",
      0x3a301d, // Brown color
      1.68, // Normal Repeat
      0.902, // Normal Intensity
      21.718, // Noise Strength
      1.57, // UV Rotation
      9.14, // UV Height
      this.resources.items.ropeDiffuse, // Diffuse texture map
      this.resources.items.ropeNormal // Normal map for surface detail
    );
// src/three/Experience/Factories/MaterialGenerator/RopeMaterialGenerator.ts
import * as THREE from "three";
import Experience from "@/three/Experience/Theater/Experience/Experience";

import vertexShader from "@/three/Experience/Shaders/Rope/vertex.glsl";
import fragmentShader from "@/three/Experience/Shaders/Rope/fragment.glsl";

import type  ResourceDiffuse, RessourceNormal  from "@/types/three.types";
import type Debug from "@/three/Experience/Utils/Debugger/Debug";

let instance: RopeMaterialGenerator | null = null;

export default class RopeMaterialGenerator
  public experience: Experience;

  private debug: Debug;

  constructor()
    //    Singleton
    if (instance)
      return instance;

    instance = this;

    this.experience = new Experience();
    this.debug = this.experience.debug;


  generateRopeMaterial(
    name: string,
    uLightColor: number,
    uNormalRepeat: number,
    uNormalIntensity: number,
    uNoiseStrength: number,
    uvRotate: number,
    uvHeight: number,
    resourceDiffuse: ResourceDiffuse,
    ressourceNormal: RessourceNormal
  )
    const normalTexture = ressourceNormal;
    normalTexture.wrapS = THREE.RepeatWrapping;
    normalTexture.wrapT = THREE.RepeatWrapping;

    const diffuseTexture = resourceDiffuse;
    diffuseTexture.wrapS = THREE.RepeatWrapping;
    diffuseTexture.wrapT = THREE.RepeatWrapping;

    const customUniforms =
      uAddedLight:
        value: new THREE.Color(0x000000),
      ,
      uLightColor:
        value: new THREE.Color(uLightColor),
      ,
      uNormalRepeat:
        value: uNormalRepeat,
      ,
      uNormalIntensity:
        value: uNormalIntensity,
      ,
      uNoiseStrength:
        value: uNoiseStrength,
      ,
      uShadowStrength:
        value: 1.296,
      ,
      uvRotate:
        value: uvRotate,
      ,
      uvHeight:
        value: uvHeight,
      ,
      uLightPosition:
        value: new THREE.Vector3(60, 100, 60),
      ,
      normalMap:
        value: normalTexture,
      ,
      diffuseMap:
        value: diffuseTexture,
      ,
      uAlpha:
        value: 1,
      ,
    ;

    const shaderUniforms = THREE.UniformsUtils.clone(
      THREE.UniformsLib["lights"]
    );
    const shaderUniformsNormal = THREE.UniformsUtils.clone(
      THREE.UniformsLib["normalmap"]
    );
    const uniforms = Object.assign(
      shaderUniforms,
      shaderUniformsNormal,
      customUniforms
    );

    const materialFloor = new THREE.ShaderMaterial(
      uniforms: uniforms,
      vertexShader: vertexShader,
      fragmentShader: fragmentShader,
      precision: "lowp",
    );

    return materialFloor;


  destroySingleton()
    ...
The vertex and its fragment
// src/three/Experience/Shaders/Rope/vertex.glsl

uniform float uNoiseStrength;      // Controls the intensity of noise effect
uniform float uNormalIntensity;    // Controls the strength of normal mapping
uniform float uNormalRepeat;       // Controls the tiling of normal map
uniform vec3 uLightColor;          // Color of the light source
uniform float uShadowStrength;     // Intensity of shadow effect
uniform vec3 uLightPosition;       // Position of the light source
uniform float uvRotate;            // Rotation angle for UV coordinates
uniform float uvHeight;            // Height scaling for UV coordinates
uniform bool isShadowBothSides;    // Flag for double-sided shadow rendering


varying float vNoiseStrength;      // Passes noise strength to fragment shader
varying float vNormalIntensity;    // Passes normal intensity to fragment shader
varying float vNormalRepeat;       // Passes normal repeat to fragment shader
varying vec2 vUv;                  // UV coordinates for texture mapping
varying vec3 vColorPrimary;        // Primary color for the material
varying vec3 viewPos;              // Position in view space
varying vec3 vLightColor;          // Light color passed to fragment shader
varying vec3 worldPos;             // Position in world space
varying float vShadowStrength;     // Shadow strength passed to fragment shader
varying vec3 vLightPosition;       // Light position passed to fragment shader

// Helper function to create a 2D rotation matrix
mat2 rotate(float angle)
    return mat2(cos(angle), -sin(angle), sin(angle), cos(angle));


void main()
    // Calculate rotation angle and its sine/cosine components
    float angle = 1.0 * uvRotate;
    float s = sin(angle);
    float c = cos(angle);

    // Create rotation matrix for UV coordinates
    mat2 rotationMatrix = mat2(c, s, -s, c);

    // Define pivot point for UV rotation
    vec2 pivot = vec2(0.5, 0.5);

    // Transform vertex position to clip space
    gl_Position = projectionMatrix * viewMatrix * modelMatrix * vec4(position, 1.0);

    // Apply rotation and height scaling to UV coordinates
    vUv = rotationMatrix * (uv - pivot) + pivot;
    vUv.y *= uvHeight;

    // Pass various parameters to fragment shader
    vNormalRepeat = uNormalRepeat;
    vNormalIntensity = uNormalIntensity;
    viewPos = vec3(0.0, 0.0, 0.0);  // Initialize view position
    vNoiseStrength = uNoiseStrength;
    vLightColor = uLightColor;
    vShadowStrength = uShadowStrength;
    vLightPosition = uLightPosition;
// src/three/Experience/Shaders/Rope/fragment.glsl
// Uniform textures for normal and diffuse mapping
uniform sampler2D normalMap;
uniform sampler2D diffuseMap;

// Varying variables passed from vertex shader
varying float vNoiseStrength;
varying float vNormalIntensity;
varying float vNormalRepeat;
varying vec2 vUv;
varying vec3 viewPos;
varying vec3 vLightColor;
varying vec3 worldPos;
varying float vShadowStrength;
varying vec3 vLightPosition;

// Constants for lighting calculations
const float specularStrength = 0.8;
const vec4 colorShadowTop = vec4(vec3(0.0, 0.0, 0.0), 1.0);

void main()
    // normal, diffuse and light accumulation
    vec3 samNorm = texture2D(normalMap, vUv * vNormalRepeat).xyz * 2.0 - 1.0;
    vec4 diffuse = texture2D(diffuseMap, vUv * vNormalRepeat);
    vec4 addedLights = vec4(0.0, 0.0, 0.0, 1.0);

    // Calculate diffuse lighting
    vec3 lightDir = normalize(vLightPosition - worldPos);
    float diff = max(dot(lightDir, samNorm), 0.0);
    addedLights.rgb += diff * vLightColor;

    // Calculate specular lighting
    vec3 viewDir = normalize(viewPos - worldPos);
    vec3 reflectDir = reflect(-lightDir, samNorm);
    float spec = pow(max(dot(viewDir, reflectDir), 0.0), 16.0);
    addedLights.rgb += specularStrength * spec * vLightColor;

    // Calculate top shadow effect. In this case, this higher is it, the darker it gets.
    float shadowTopStrength = 1.0 - pow(vUv.y, vShadowStrength) * 0.5;
    float shadowFactor = smoothstep(0.0, 0.5, shadowTopStrength);

    // Mix diffuse color with shadow.
    vec4 mixedColorWithShadowTop = mix(diffuse, colorShadowTop, shadowFactor);
    // Mix lighting with shadow
    vec4 addedLightWithTopShadow = mix(addedLights, colorShadowTop, shadowFactor);

    // Final color composition with normal intensity control
    gl_FragColor = mix(mixedColorWithShadowTop, addedLightWithTopShadow, vNormalIntensity);
Once the material is created and added to the mesh, the
addRopeToScene
function adds the rope to the scene, then calls the
addPhysicsToRope
function from the physics file.
// src/three/Experience/Theater/World/Theater/Rope/RopeModel.ts
  addRopeToScene(mesh: Mesh, location: Location)
    this.list.rope.push(mesh); //Add the rope to an array, which will be used by the physics file to update the mesh
    this.scene.add(mesh);
    this.physics.rope.addPhysicsToRope(location); // same as src/three/Experience/Theater/Physics/Theater/Rope/Rope.addPhysicsToRope(location)
Let ‘s now focus on the physics file.
// src/three/Experience/Theater/Physics/Theater/Rope/Rope.ts

import * as CANNON from "cannon-es";

import Experience from "@/three/Experience/Theater/Experience/Experience";

import type  Location  from "@/types/experience.types";
import type Physics from "@/three/Experience/Theater/Physics/Physics";
import type  Scene, SphereBody  from "@/types/three.types";

let instance: Rope | null = null;

const SIZE_SPHERE = 0.05;
const ANGULAR_DAMPING = 1;
const DISTANCE_BETWEEN_SPHERES = SIZE_SPHERE * 5;
const DISTANCE_BETWEEN_SPHERES_BOTTOM = 2.3;
const DISTANCE_BETWEEN_SPHERES_TOP = 6;
const LINEAR_DAMPING = 0.5;
const NUMBER_OF_SPHERES = 20;

export default class Rope
  public experience: Experience;
  public physics: Physics;
  public scene: Scene;
  public list: list[];

  constructor()
    //    Singleton
    if (instance)
      return instance;

    instance = this;

    this.experience = new Experience();
    this.scene = this.experience.scene;
    this.physics = this.experience.physics;

    this.list =
      rope: [],
    ;


  //#region add physics
  addPhysicsToRope()
   ...


  setRopePhysics()
    ...


  setMassRope()
   ...


  setDistanceBetweenSpheres()
    ...


  setDistanceBetweenConstraints()
   ...


  addConstraints()
    ...

  //#endregion add physics

  //#region update at 60FPS
  update()
    ...


  loopRopeWithPhysics()
    ...


  updatePoints()
    ...

  //#endregion update at 60FPS

  destroySingleton()
    ...
The rope’s physics is created from the mesh file using the methods
addPhysicsToRope
, called using
this.physics.rope.addPhysicsToRope(location);.
addPhysicsToRope(location: Location)
  this.setRopePhysics(location);


setRopePhysics(location: Location)
  const sphereShape = new CANNON.Sphere(SIZE_SPHERE);
  const rope = [];

  let lastBody = null;
  for (let index = 0; index < NUMBER_OF_SPHERES; index++)
    // Create physics body for each sphere in the rope. The spheres will be what collide with the player
    const spherebody = new CANNON.Body( mass: this.setMassRope(index) );

    spherebody.addShape(sphereShape);
    spherebody.position.set(
      location.x,
      location.y - index * DISTANCE_BETWEEN_SPHERES,
      location.z
    );
    this.physics.physics.addBody(spherebody);
    rope.push(spherebody);
    spherebody.linearDamping = LINEAR_DAMPING;
    spherebody.angularDamping = ANGULAR_DAMPING;

    // Create constraints between consecutive spheres
    lastBody !== null
      ? this.addConstraints(spherebody, lastBody, index)
      : null;

    lastBody = spherebody;

    if (index + 1 === NUMBER_OF_SPHERES)
      this.list.rope.push(rope);


setMassRope(index: number)
  return index === 0 ? 0 : 2; // first sphere is fixed (mass 0)


setDistanceBetweenSpheres(index: number, locationY: number)
  return locationY - DISTANCE_BETWEEN_SPHERES * index;


setDistanceBetweenConstraints(index: number)
// since the user only interact the spheres are the bottom, so the distance between the spheres is gradualy increasing from the bottom to the top//Since the user only interacts with the spheres that are at the bottom, the distance between the spheres is gradually increasing from the bottom to the top
  if (index <= 2)
    return DISTANCE_BETWEEN_SPHERES * DISTANCE_BETWEEN_SPHERES_TOP;

  if (index > 2 && index <= 8)
    return DISTANCE_BETWEEN_SPHERES * DISTANCE_BETWEEN_SPHERES_BOTTOM;

  return DISTANCE_BETWEEN_SPHERES;


addConstraints(
  sphereBody: CANNON.Body,
  lastBody: CANNON.Body,
  index: number
)
  this.physics.physics.addConstraint(
    new CANNON.DistanceConstraint(
      sphereBody,
      lastBody,
      this.setDistanceBetweenConstraints(index)
    )
  );
When configuring physics parameters, strategy is key. Although users won ‘t consciously notice during gameplay, they
can only interact with the lower portion of the rope. Therefore, I concentrated more physics detail where it matters –
by adding more spheres to the bottom of the rope.
of the rope than at the top of the rope.
Rope meshes are then updated every frame from the physics file.
 //#region update at 60FPS
 update()
  this.loopRopeWithPhysics();


loopRopeWithPhysics()
  for (let index = 0; index < this.list.rope.length; index++)
    this.updatePoints(this.list.rope[index], index);


updatePoints(element: CANNON.Body[], indexParent: number)
  element.forEach((item: CANNON.Body, index: number) =>
    // Update the mesh with the location of each of the physics spheres
    this.experience.world.rope.list.rope[
      indexParent
    ].geometry.parameters.path.points[index].copy(item.position);
  );

//#endregion update at 60FPS
Animations in the DOM – ticket tearing particles
While the website heavily relies on Three.js to create an immersive experience, many elements remain DOM-based. One of
my goals for this portfolio was to combine both worlds: the rich, interactive 3D environments and the efficiency of
traditional DOM elements. Furthermore, I genuinely enjoy coding DOM-based micro-interactions, so skipping out on them
wasn ‘t an option!
One of my favorite DOM animations is the ticket-tearing effect, especially the particles flying away. It ‘s subtle,
but adds a bit of charm. The effect is not only fun to watch but also relatively easy to adapt to other projects.
First, let ‘s look at the structure of the components.
TicketBase.vue
is a fairly simple file with minimal styling. It handles the tearing animation and a few basic functions. Everything
else related to the ticket such as the style is handled by other components passed through slots.
To make things clearer, I ‘ve cleaned up my
TicketBase.vue
file a bit to highlight how the particle effect works.
import  computed, ref, watch, useSlots  from "vue";
import  useAudioStore  from "@/stores/audio";

import type  TicketBaseProps  from "./types";

const props = withDefaults(defineProps<TicketBaseProps>(),
  isTearVisible: true,
  isLocked: false,
  cardId: null,
  isFirstTear: false,
  runTearAnimation: false,
  isTearable: false,
  markup: "button",
);

const  setCurrentFx  = useAudioStore();

const emit = defineEmits(["hover:enter", "hover:leave"]);

const particleContainer = ref<HTMLElement | null>(null);
const particleContainerTop = ref<HTMLElement | null>(null);
const timeoutParticles = ref<NodeJS.Timeout | null>(null);
const isAnimationStarted = ref<boolean>(false);
const isTearRipped = ref<boolean>(false);

const isTearable = computed(
  () => isTearVisible || (!isTearVisible && isFirstTear)
);

const handleClick = () =>
  ...
;

const runTearAnimation = () =>
  ...
;

const createParticles = () =>
  ...
;

const deleteParticles = () =>
  ...
;

const toggleIsAnimationStarted = () =>
...
;

const cssClasses = computed(() => [
  ...
]);


.ticket-base
   ...


/* particles can't be scoped */
.particle
...
When a ticket is clicked (or the user presses Enter), it runs the function
handleClick()
, which then calls
runTearAnimation()
.
const handleClick = () => ;

...

const runTearAnimation = () =>
  toggleIsAnimationStarted(true);

  createParticles(particleContainerTop.value, "bottom");
  createParticles(particleContainer.value, "top");
  isTearRipped.value = true;
  // add other functions such ad tearing SFX
;


...

const toggleIsAnimationStarted = (bool: boolean) =>
  isAnimationStarted.value = bool;
;
The
createParticles
function creates a few new
<div>
elements, which act as the little particles. These divs are then appended to either the main part of the ticket or the
torn part.
const createParticles = (containerSelector: HTMLElement, direction: string) =>
  const numParticles = 5;
  for (let i = 0; i < numParticles; i++)
    const particle = document.createElement("div");
    particle.className = "particle";

    // Calculate left position based on index and add small random offset
    const baseLeft = (i / numParticles) * 100;
    const randomOffset = (Math.random() - 0.5) * 10;
    particle.style.left = `calc($baseLeft% + $randomOffset%)`;

    // Assign unique animation properties
    const duration = Math.random() * 0.3 + 0.1;
    const translateY = (i / numParticles) * -20 - 2;
    const scale = Math.random() * 0.5 + 0.5;
    const delay = ((numParticles - i - 1) / numParticles) * 0;

    particle.style.animation = `flyAway $durations $delays ease-in forwards`;
    particle.style.setProperty("--translateY", `$translateYpx`);
    particle.style.setProperty("--scale", scale.toString());

    if (direction === "bottom")
      particle.style.animation = `flyAwayBottom $durations $delays ease-in forwards`;


    containerSelector.appendChild(particle);

    // Remove particle after animation ends
    particle.addEventListener("animationend", () =>
      particle.remove();
    );

;
The particles are animated using a CSS keyframes animation called
flyAway
or
flyAwayBottom
.
.particle
  position: absolute;
  width: 0.2rem;
  height: 0.2rem;
  background-color: var(--color-particles); /* === #655c52 */

  animation: flyAway 3s ease-in forwards;


@keyframes flyAway
  0%
    transform: translateY(0) scale(1);
    opacity: 1;

  100%
    transform: translateY(var(--translateY)) scale(var(--scale));
    opacity: 0;


@keyframes flyAwayBottom
  0%
    transform: translateY(0) scale(1);
    opacity: 1;

  100%
    transform: translateY(calc(var(--translateY) * -1)) scale(var(--scale));
    opacity: 0;
Additional Featured Animations
There are so many features, details easter eggs and animation I wanted to cover in this article, but it’s simply not
possible to go through everything as it would be too much and many deserve their own tutorial.
That said, here are some of my favorites to code. They definitely deserve a spot in this article.
navigation animation, collision animation.
Reflections on Aurel’s Grand Theater
Even though it took longer than I originally anticipated, Aurel ‘s Grand Theater was an incredibly fun and rewarding
project to work on. Because it wasn ‘t a client project, it offered a rare opportunity to freely experiment, explore
new ideas, and push myself outside my comfort zone, without the usual constraints of budgets or deadlines.
Looking back, there are definitely things I ‘d approach differently if I were to start again. I ‘d spend more time
defining the art direction upfront, lean more heavily into GPU, and perhaps implement Rapier. But despite these
reflections, I had an amazing time building this project and I ‘m satisfied with the final result.
While recognition was never the goal, I ‘m deeply honored that the site was acknowledged. It received FWA of the Day,
Awwwards Site of the Day and Developer Award, as well as GSAP’s Site of the Week and Site of the Month.
I ‘m truly grateful for the recognition, and I hope this behind-the-scenes look and shared code snippets inspire you
in your own creative coding journey.