
Image by Author | Canva
Let’s be honest — machine learning can be overwhelming. There are so many steps involved: cleaning your data, engineering features, picking the right model, tuning parameters, and evaluation. Each step is iterative, time-consuming, and requires deep technical expertise. And to make matters worse, the field progresses fast—state-of-the-art methods, libraries, and best practices emerge faster than most practitioners can keep up. It’s enough to make your head spin, whether you’re just starting out or have been in the field for years.
But here’s the good news – you don’t have to do it all manually anymore. AutoML streamlines the whole ML process, and you can develop high-performing models with a couple of lines of code. It takes care of the tedious, repetitive tasks so you can take care of actual problems rather than getting stuck in the technical details.
In this guide, you’ll learn how to install AutoGluon, train your first model, and interpret the results—all in a simple, beginner-friendly way. Let’s get started!
What is AutoGlon?
AutoGluon is one of the SOTA open-source AutoML libraries developed by Amazon Web Services (AWS). It allows you to train high-quality machine learning models with just a few lines of code. AutoGluon automates:
- Model selection: Tests algorithms to find the best fit.
- Hyperparameter tuning: Optimizes model settings for performance.
- Feature preprocessing: Handles missing values, categorical data, and scaling.
- Ensembling: Combines models to boost accuracy.
It supports tabular data, text, images, and more. For this tutorial, we’ll focus on tabular data (e.g., spreadsheets).
Step 1: Installation
AutoGluon is supported on Python 3.9 – 3.12 and is available on Linux, MacOS, and Windows. Verify your Python version:
Install AutoGluon via pip:
⚠️ Note: Installation may take few minutes due to dependencies. If you encounter issues, check the official documentation.
Step 2: Train Your First AutoGluon Model
Let’s predict survival on the Titanic dataset (a classic beginner-friendly problem).
2.1 Import Libraries and Load Data
from autogluon.tabular import TabularDataset, TabularPredictor
from sklearn.model_selection import train_test_split
import pandas as pd

url="https://raw.githubusercontent.com/datasciencedojo/datasets/master/titanic.csv"
data = TabularDataset(url)

# Split into train and test sets (80% training, 20% testing)
train_data, test_data = train_test_split(data, test_size=0.2, random_state=42)
print(f"Training samples: len(train_data)")
print(f"Testing samples: len(test_data)")
Output:
Training samples: 712
Testing samples: 179
2.2 Train the Model
# Define target variable (what we want to predict)
target="Survived"

# Train the model
predictor = TabularPredictor(label=target).fit(
    train_data=train_data,
    time_limit=120,  # 2 minutes for quick results (increase for better accuracy)
    presets="best_quality"  # Options: 'medium_quality', 'high_quality' (faster vs. slower)
)
- TabularPredictor: Sets up the task (classification/regression)
fit(): Trains multiple modelstime_limit: Controls training duration- presets: Balances speed vs. accuracy.
best_qualitymaximizes accuracy but takes longer
Step 3: Evaluate Model Performance
After training, evaluate the model on test data:
# Generate predictions
y_pred = predictor.predict(test_data.drop(columns=[target]))

# Evaluate accuracy
performance = predictor.evaluate(test_data)
print(f"Model Accuracy: performance['accuracy']:.2f")
Output:
Model Accuracy: 0.80
The leaderboard shows all models AutoGluon tested, ranked by performance. The top model is an ensemble of the best performers.
leaderboard = predictor.leaderboard(test_data)
print(leaderboard) 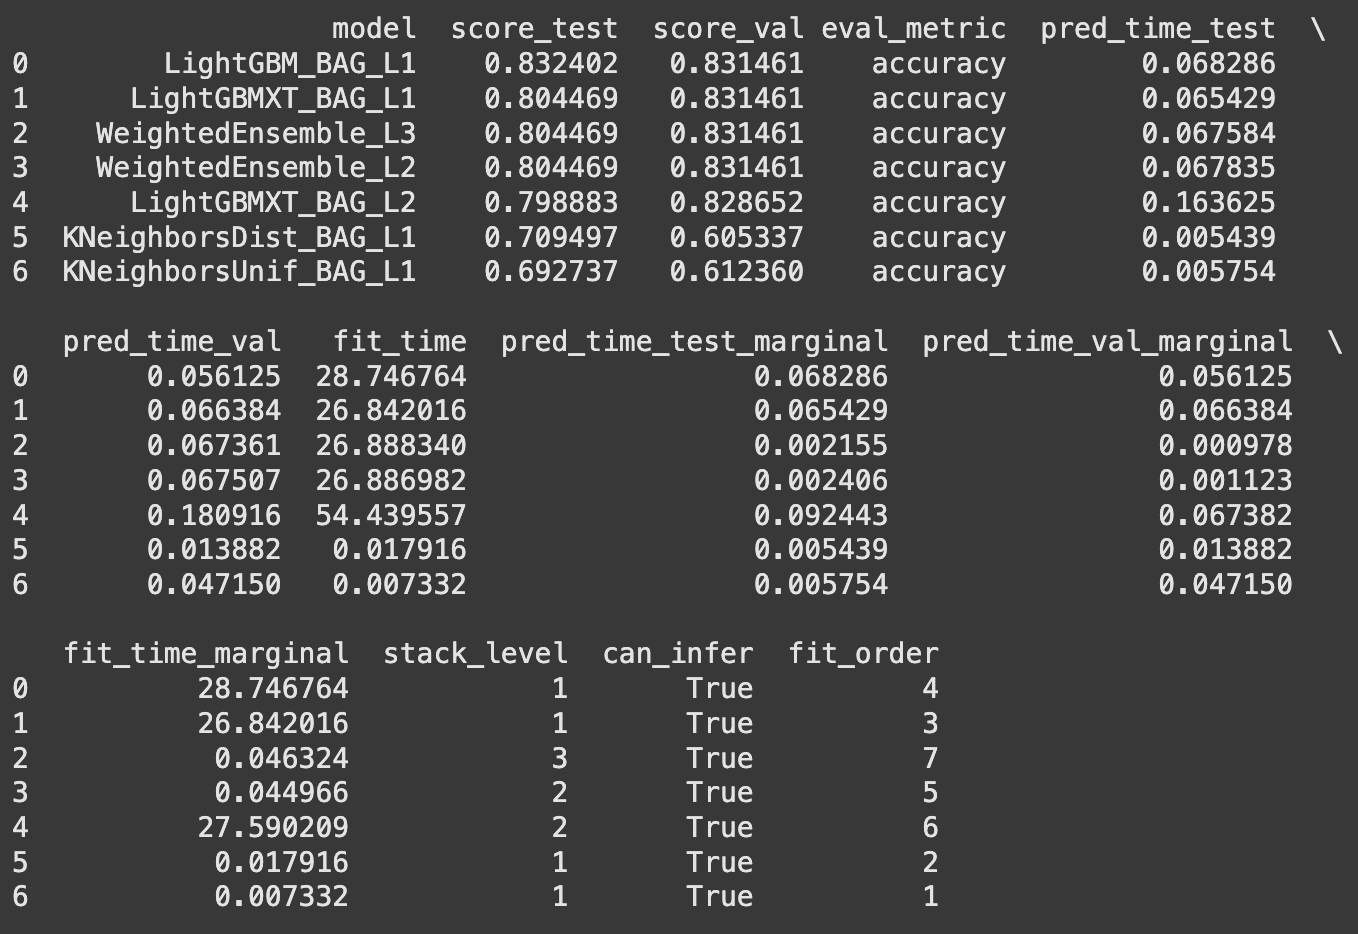
Step 4: Make Predictions on New Data
Use your model to predict unseen examples:
new_passenger = pd.DataFrame(
    'PassengerId': [99999],
    'Pclass': [3],           # Passenger class (1st, 2nd, 3rd)
    'Name': ['John Doe'],
    'Sex': ['male'],
    'Age': [25],
    'Ticket': ['UNKNOWN'],
    'Fare': [7.25],
    'Cabin': ['UNKNOWN'],
    'Embarked': ['S'],      # Most common value ('S' for Southampton)
    'SibSp': [0],           # Siblings aboard
    'Parch': [0]            # Parents/children aboard
)

prediction = predictor.predict(new_passenger)
print(f"Survival prediction: 'Yes' if prediction[0] == 1 else 'No'")
Output:
Survival prediction: No
Tips for Success
- Clean Your Data First:
- Remove irrelevant columns (e.g., PassengerId)
- Handle missing values (AutoGluon does this, but better data = better results)
- Start with
time_limit=120(2 minutes) for quick prototyping - Increase to
time_limit=600(10 minutes) for better accuracy
- Create new features (e.g., family size = SibSp + Parch)
- AutoGluon can’t replace domain knowledge—guide it with relevant features
- Computational Cost: Long
time_limitvalues require more resources - Black-Box Models: AutoGluon prioritizes performance over interpretability.
Wrapping Up
In just a few lines of code, you’ve trained a model, evaluated it, and made predictions—no PhD required! From here, try:
- Different Datasets: Experiment with Kaggle competitions or your own data
- Other Modalities: Explore AutoGluon’s support for images and text
- Hyperparameter Tuning: Override AutoGluon’s defaults for finer control
Kanwal Mehreen Kanwal is a machine learning engineer and a technical writer with a profound passion for data science and the intersection of AI with medicine. She co-authored the ebook “Maximizing Productivity with ChatGPT”. As a Google Generation Scholar 2022 for APAC, she champions diversity and academic excellence. She’s also recognized as a Teradata Diversity in Tech Scholar, Mitacs Globalink Research Scholar, and Harvard WeCode Scholar. Kanwal is an ardent advocate for change, having founded FEMCodes to empower women in STEM fields.