As a developer, you’re likely subscribed to a dozen newsletters, blogs, and RSS feeds, all competing for your attention. When you’re focused on building projects or learning new tech, finding time to sift through all that content can be a challenge.
What if AI agents curated all your newsletters into one?
In this tutorial, you’ll learn how to build an AI-powered newsletter aggregator using React and KaibanJS. By setting up multiple AI agents, you’ll automate the process of:
- Fetching articles from various newsletters.
- Filtering content based on your interests and topics
- Aggregating everything into a single, easy-to-read format all within your JavaScript environment.
With KaibanJS, you’ll take advantage of AI Agents that handle each step of the process. Best of all, you’ll be able to set this up in just 10 minutes, making it a quick and powerful addition to your development toolkit.
KaibanJS is a new open-source JavaScript framework for building multi-agent systems.
By the end of this tutorial, you’ll have a fully functional newsletter aggregator that keeps you updated on the topics that matter to you, automatically.
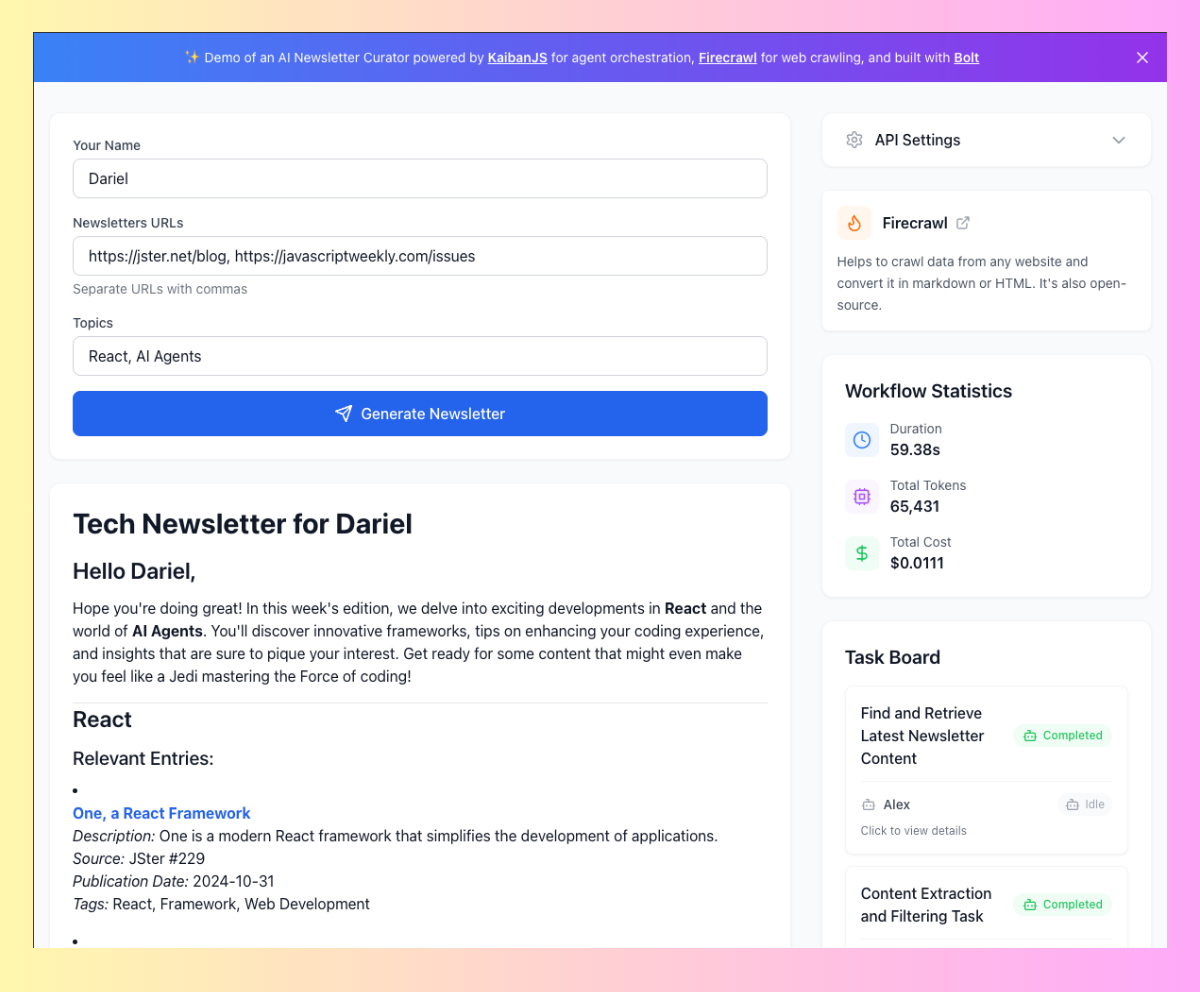
Give it a try first: Explore this live demonstration of the AI agents in action! This example will provide a hands-on look at how the agents work together to gather, filter, and present newsletter content. Dive in to get a feel for the process before you start building your own setup in this 10-minute tutorial. 😅

Quick Navigation
Understanding AI Agents
If you’re not familiar with AI agents or AI in general, don’t worry! They might sound complex, but they’re essentially smart tools that can self-automate repetitive tasks for you.
Let’s break it down:
1) What is an AI Agent?
An AI agent is like a self-sufficient function that can handle tasks on its own. Once you give it a job or a goal, the agent works autonomously to get it done. For example, an agent could:
- Plan how to collect the data.
- Decide if it needs to run web searches or pull from an API.
- Write a draft based on the data it found.
- Review the draft for improvements.
- Revise the content to make it better.
The key is that the agent does all of this independently, without you having to manage each step. It’s like having a very specialized co-worker in a given task that will not stop until the task is done.

2) How do Agents work?
Here’s a quick video that gives you an overview of the main concepts, including how KaibanJS agents execute tasks, use tools, and collaborate to handle workflows.
1. Agents Execute Tasks
Each agent is assigned a specific task to complete. These tasks could be as simple as gathering data from a web API or as complex as generating summaries or making decisions. Once a task is given, the agent works autonomously to finish it without further instructions.
2. Agents Use Tools
Agents often need access to external tools to complete their tasks. These tools could be APIs, databases, or even web searches. For example, a Researcher Agent might use a search API to gather articles, while a Writer Agent could use a language model to summarize the content.
3. Agents Collaborate with Other Agents
In KaibanJS, agents don’t work alone—they can collaborate with other agents. For example, a Researcher Agent might gather data, and once the data is ready, a Writer Agent can step in to create a summary. This allows you to break complex workflows into smaller, manageable tasks, each handled by specialized agents.
3) What Can You Build with Multiple Agents?
Here are some examples Javascript developers can build using multiple agents:
- An AI code editor like Cursor AI, which assists you in writing and debugging code with AI.
- An AI-powered search assistant like Perplexity AI, where a team of agents retrieves, processes, and provides concise answers from multiple sources.
- A CI/CD pipeline agent that reviews pull requests, checks code quality, and suggests improvements to maintain high standards in your projects.
Now that you understand how AI agents work and what makes them so powerful, it’s time to get hands-on. Let’s set up KaibanJS and start building your first agent-driven workflow.
Setup
To get started, clone the demo repository from GitHub:
git clone https://github.com/kaiban-ai/kaiban-agents-aggregatorThen, navigate to your project directory and run the following command in your terminal:
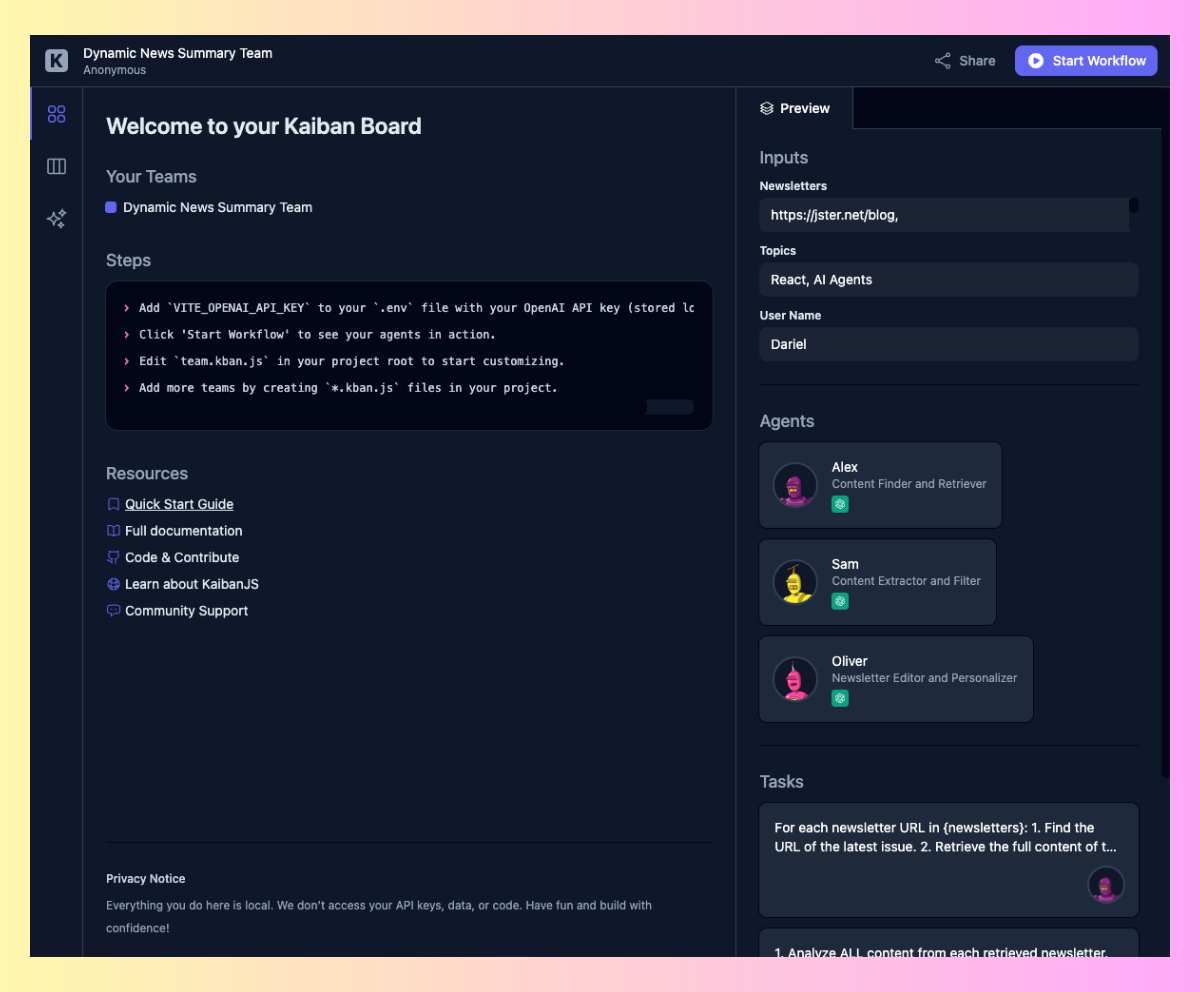
npx kaibanjs@latest initThis command will install KaibanJS in your project and set up a basic structure. It will also open the Kaiban Board in your browser, where you can visually manage agents and tasks (kind of a cute playground).

To enable specific agents (like the content retrieval agent) to use tools that require API keys, create a .env file in your project’s root directory and add your keys there:
VITE_FIRECRAWL_API_KEY=your_firecrawl_api_key
VITE_OPENAI_API_KEY=your_openai_api_key
Where to get the API keys:
- Firecrawl API Key: Sign up at Firecrawl to create an account and obtain an API key for web scraping capabilities.
- OpenAI API Key: Visit OpenAI’s website to create an account and obtain an API key, which will allow agents to use language processing capabilities with OpenAI models.
Create your team of Agents
Open team.kban.js in your project root. Let’s walk through each part of the system to understand how it works.
1. Initial Setup and Tools
First, we import our dependencies and set up the web scraping tool:
import  Agent, Task, Team  from 'kaibanjs';
import  Firecrawl  from '@kaibanjs/tools';

// Initialize the Firecrawl tool
const firecrawlTool = new Firecrawl(
  apiKey: import.meta.env.VITE_FIRECRAWL_API_KEY
);
The Firecrawl tool (firecrawl.dev) is essential for fetching content from various websites in a digestible format for LLMs. It requires an API key which you can obtain on their website. (You can build this yourself using their open source version or puppeteer… but I was just too lazy 😅)
2. Defining Our Agents
We create three specialized agents, each with unique capabilities:
- Alex fetches raw content using the Firecrawl tool (Notice how Alex is smart enough to automatically get the latest newsletter issue from the issues list…)
- Sam analyzes and filters the content based on user interests
- Oliver transforms the filtered content into a polished newsletter
// Define Agents
const contentRetrievalAgent = new Agent(
  name: 'Alex',
  role: 'Content Finder and Retriever',
  goal: 'Find the latest issues of provided newsletters and retrieve their content.',
  background: 'Web Scraping, URL Extraction, and Content Retrieval',
  tools: [firecrawlTool],
  maxIterations: 15,
);

const contentExtractorAgent = new Agent(
  name: 'Sam',
  role: 'Content Extractor and Filter',
  goal: `Extract and filter information related to specified topics from
         the retrieved newsletter content.`,
  background: 'Content Analysis, Information Extraction, and Topic Filtering',
  tools: [],
);

const editorAgent = new Agent(
  name: 'Oliver',
  role: 'Newsletter Editor and Personalizer',
  goal: `Format the extracted content into a newsletter with a personalized,
         engaging introduction.`,
  background: 'Content Organization, Newsletter Writing, and Personalization',
  tools: [],
);
3. Creating Specific Tasks
Each agent needs clear instructions about what to accomplish:
// Define Tasks
const contentRetrievalTask = new Task(
  title: 'Find and Retrieve Latest Newsletter Content',
  description: `
    For each newsletter URL in newsletters:
    1. Find the URL of the latest issue.
    2. Retrieve the full content of the latest issue.
    Return the content from all newsletters.
  `,
  expectedOutput: 'Raw content from the latest issues of all provided newsletters.',
  agent: contentRetrievalAgent,
);

const contentExtractionTask = new Task(
  title: 'Content Extraction and Filtering Task',
  description: `
    1. Analyze ALL content from each retrieved newsletter.
    2. Extract ANY and ALL information related to the provided topics: topics.
    3. Use a broad interpretation of relevance to ensure no potentially relevant items are missed.
    4. For each extracted item, capture:
       - Full article title with its URL
       - Complete original description or snippet
       - Newsletter source name
       - Publication date
       - Any associated tags, categories, or keywords
    5. Group the extracted information by topic. An item can appear under multiple topics if relevant.
    6. If an item's relevance is uncertain, include it and note the uncertainty.
  `,
  expectedOutput: 'Structured data containing all extracted and filtered content, grouped by topic.',
  agent: contentExtractorAgent,
);

const editingTask = new Task(
  title: 'Newsletter Editing and Personalization Task',
  description: `
    1. Format the extracted content into a newsletter structure.
    2. Create a personalized, engaging introduction for userName:
       - Start with a friendly greeting using the user's name.
       - Briefly mention the topics covered (topics).
       - Tease some interesting content or trends from the articles.
       - Optionally, include a subtle nerdy reference (preferably Star Wars-related) that fits naturally.
       - Keep the tone professional yet friendly, suitable for a tech newsletter.
    3. Organize the content by topics, with each topic as a section.
    4. Under each topic, list the relevant entries with all captured information.
    5. Add a summary of item counts for each topic and newsletter at the end.
  `,
  expectedOutput: 'A complete, markdown-formatted newsletter',
  agent: editorAgent,
);
Notice how each task:
- Has a clear title and detailed instructions
- Uses placeholders like
newsletters,topics, anduserNamewhich will be filled with user inputs - Specifies what output to expect
- Is assigned to the appropriate agent
4. Building the Team
Finally, we assemble everything into a coordinated team:
// Define the Team
export const newsSummaryTeam = new Team(
  name: 'Dynamic News Summary Team',
  agents: [contentRetrievalAgent, contentExtractorAgent, editorAgent],
  tasks: [contentRetrievalTask, contentExtractionTask, editingTask],
  inputs:
    newsletters: '',  // Will be filled with newsletter URLs
    topics: '',      // Will be filled with user's interests
    userName: '',    // Will be filled with user's name
  ,
  env:
    OPENAI_API_KEY: import.meta.env.VITE_OPENAI_API_KEY,
  ,
);
The team configuration:
- Lists all agents and their tasks in the order they’ll execute
- Provides placeholders for user inputs
- Sets up necessary environment variables
💡 You can find the full implementation in our GitHub repository, including additional features and optimizations!
You can run the team programmatically and handle its output through the console or any API:
// Start the workflow programmatically
team.start(
  newsletters: 'https://newsletter1.com,https://newsletter2.com',
  topics: 'React, AI',
  userName: 'Dev'
)
  .then((output) =>
    console.log("Workflow completed:", output.result);
  )
  .catch((error) =>
    console.error("Workflow error:", error);
  );
For this tutorial though, let’s visualize our workflow using the Kaiban Board.
Your Team in the Kaiban Board
Now that you’ve configured your team, you’ll see your newsletter aggregation workflow come to life.
Remember the Kaiban Board that opened when you ran npx kaibanjs@latest init? If you closed your terminal or need to restart the board, simply run:
npm run kaiban
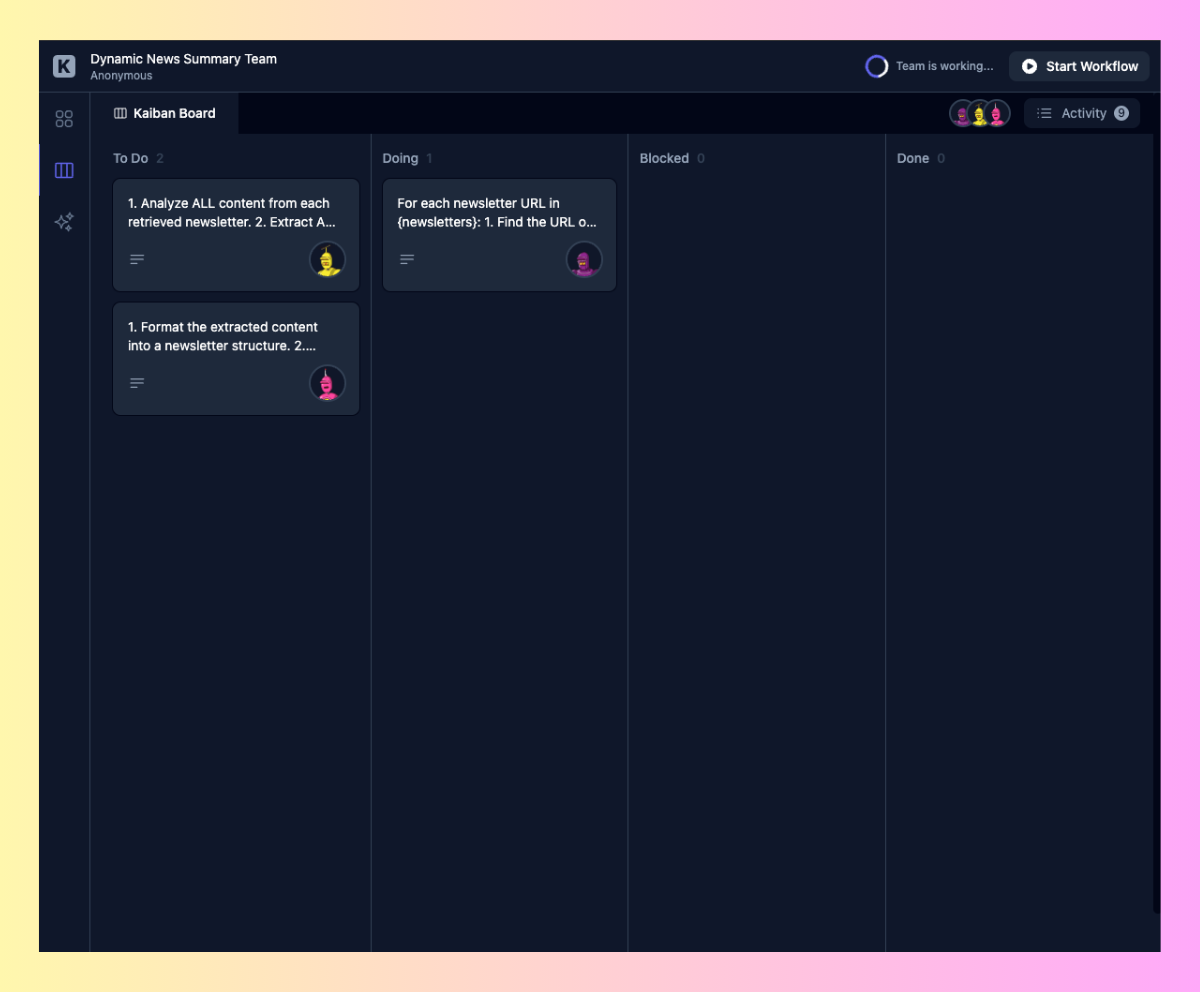
The board displays your three tasks nicely organized in the “To Do” column:
- Alex’s 👤 content retrieval task – ready to fetch newsletter content
- Sam’s 👤 extraction task – prepared to filter and organize information
- Oliver’s 👤 editing task – waiting to create your personalized newsletter
As you click “Start Workflow”, you’ll see these tasks move through the columns from
“To Do” → “Doing” → “Done”, with your agents working together to create your newsletter.
💡 Watch the board update in real-time as your agents work. You can click on any task to see details about what each agent is doing!
Now that your team is set up and visible in the Kaiban Board, let’s move on to…
Building a Custom UI with React
While the Kaiban Board is great for experimenting and collaborating with your team, chances are you’ll want to create a custom UI using React or any other frontend framework. Let’s build one together!

Want to see the complete implementation?
Step 1: Basic Setup
First, create a new React component and connect it to our KaibanJS store:
import React,  useState  from 'react';
import newsSummaryTeam from '../team.kban.js';
import ReactMarkdown from 'react-markdown';

function NewsletterApp()
  const useTeamStore = newsSummaryTeam.useStore();
  const  teamWorkflowStatus, workflowResult, inputs  = useTeamStore(state => (
    teamWorkflowStatus: state.teamWorkflowStatus,
    workflowResult: state.workflowResult,
    inputs: state.inputs
  ));

  const [topic, setTopic] = useState(inputs.topics);
  const [newsletters, setNewsletters] = useState(inputs.newsletters);

  return (
    <div>
      /* We'll add our UI here */
    </div>
  );
Step 2: Adding User Inputs
Let’s add inputs for topics and newsletter URLs:
function NewsletterApp()
  const useTeamStore = newsSummaryTeam.useStore();
  const  teamWorkflowStatus, workflowResult, inputs  = useTeamStore(state => (
    teamWorkflowStatus: state.teamWorkflowStatus,
    workflowResult: state.workflowResult,
    inputs: state.inputs
  ));

  const [topic, setTopic] = useState(inputs.topics);
  const [newsletters, setNewsletters] = useState(inputs.newsletters);
  const [userName, setUserName] = useState(inputs.userName);
  const [workflowStats, setWorkflowStats] = useState(null);

  const generateNewsletter = async () =>
    try
      setWorkflowStats(null);
      const output = await newsSummaryTeam.start(
        topics: topic,
        newsletters,
        userName: userName );

      // Other code...

     catch (error)
      console.error('Error generating newsletter:', error);

  ;

  return (
    <form>
      <label htmlFor="newsletters">Newsletters URLs</label>
      <input
        id="newsletters"
        type="text"
        value=newsletters
        onChange=(e) => setNewsletters(e.target.value)
        placeholder="Enter newsletter URLs (comma-separated)..."
      />

      <label htmlFor="topics">Topics</label>
      <input
        id="topics"
        type="text"
        value=topic
        onChange=(e) => setTopic(e.target.value)
        placeholder="E.g. 'ReactJS, NextJS'"
      />

      <button
        onClick=generateNewsletter
        disabled=
      >
        <Send />
        Generate Newsletter
      </button>
    </form>
  );
Step 3: Monitoring Agents and Tasks
Add real-time monitoring of your agents and tasks:
function NewsletterApp()
  // ... previous code ...

  // Add these to your store connection
  const  agents, tasks  = useTeamStore(state => (
    agents: state.agents,
    tasks: state.tasks
  ));

  return (
    <div className="max-w-4xl mx-auto p-6">
      /* Previous inputs */

      <div className="mt-6 grid grid-cols-2 gap-4">
        /* Agents Status */
        <div>
          <h3 className="font-medium mb-2">Agents</h3>
          agents.map(agent => (
            <div key=agent.id className="p-2 bg-gray-50 rounded mb-2">
              agent.name: agent.status
            </div>
          ))
        </div>

        /* Tasks Status */
        <div>
          <h3 className="font-medium mb-2">Tasks</h3>
          tasks.map(task => (
            <div key=task.id className="p-2 bg-gray-50 rounded mb-2">
              task.title: task.status
            </div>
          ))
        </div>
      </div>
    </div>
  );
Step 4: Displaying the Newsletter
Finally, let’s add the newsletter display:
function NewsletterApp()
  // ... previous code ...

  return (
    <div className="max-w-4xl mx-auto p-6">
      /* Previous sections */

      <div className="mt-6 prose max-w-none">
        workflowResult ? (
          <ReactMarkdown>workflowResult</ReactMarkdown>
        ) : (
          <p className="text-gray-500 text-center">
            No newsletter generated yet. Enter topics and click 'Generate'.
          </p>
        )
      </div>
    </div>
  );


export default NewsletterApp;
Want to Add More Features?
This example shows the basic implementation, but there’s much more you can add! The complete version in our GitHub repository includes additional features like:
- Workflow statistics tracking
- Detailed logs display
- API key management
- Advanced error handling
- Enhanced UI with Tailwind CSS
💡 To dive deeper browse the repository to see how each feature is implemented.
Wrapping Up
We’ve explored how to build an AI-powered newsletter aggregator that transforms the way we consume newsletter content. By combining KaibanJS’s agent orchestration capabilities with React, we’ve created a tool that automatically curates and presents content that matters to us.
The best part? This is just the beginning of what you can build with AI agents. Consider extending this project by:
- Adding support for different content sources
- Creating custom newsletter templates
- Implementing automatic scheduling
- Building personalized recommendation systems
We’d love to hear about your experience! Feel free to share your setup, any challenges you faced, or customizations you added. Leave a comment below or tag us on social media to showcase your project!
KaibanJS is an open-source project, and we’d love your help in making it even better! Star the repository, report bugs, submit pull requests, or help us to improve the documentation.
Every contribution, no matter how small, helps make AI development more accessible to everyone.
Believe in love ✌️
