
At its core, Stable Diffusion is a deep learning model that can generate pictures. Together with some other models and UI, you can consider that as a tool to help you create pictures in a new dimension that not only you can provide instructions on how the picture looks like, but also the generative model to brainstorm what you didn’t specify.
In this 7-part crash course, you will learn from examples how to make use of Stable Diffusion to finish a drawing project. This mini-course is focused on the use of generative AI models, but not their internal mechanism. Therefore, you shouldn’t worry about the sophisticated theory of how they can provide such amazing results. Yet, since nothing can be done in a single step, you should expect to learn how the many extensions and parameters play together to finish an image generation project. Let’s get started.
Interior Design with Stable Diffusion (7-day mini-course)
Photo by Arno Smit. Some rights reserved.
Who Is This Mini-Course For?
Before we start, let’s ensure you are in the right place. The list below provides some general guidelines as to who this course was designed for. Don’t panic if you don’t match these points exactly; you might just need to brush up in one area or another to keep up.
- You know what is a generative model. You are not expecting magic. Everything you’re going to see is the result of some sophisticated algorithms. Therefore, all results can be explained and the steps are reusable once you know what’s under the hood.
- You are not an artist. You are not painting on a digital canvas. Indeed, you create a picture without painting. The generative model does not allow you to control too much detail, but you can give some high-level instructions. This means you should not expect to be able to control the output precisely. And you also do not need to learn the drawing techniques to create a good picture.
- You have the patience to work on a project. Similar to creating a picture with a paintbrush, you need to be patient, and it takes time to finish a project. Unlike painting, the time you spend is to experiment with the different knobs in the generation pipeline. Depending on the nature of your project, you need to check what are the optimal parameters for the best result.
This mini-course is not a textbook on stable diffusion. But you are going to see how the many components work and how they help in the final result of image generation. The key is to to know the role of each component and parameter so that you can decide how you want to use them in your next project.
Mini-Course Overview
This mini-course is divided into eight parts.
Each lesson was designed to take around 30 minutes. You might finish some much sooner, and in others, you may choose to go deeper and spend more time.
You can complete each part as quickly or as slowly as you like. A comfortable schedule may be to complete one lesson daily over eight days. Highly recommended.
The topics you will cover over the next 8 lessons are as follows:
- Lesson 01: Create Your Stable Diffusion Environment
- Lesson 02: Make Room for Yourself
- Lesson 03: Trial and Error
- Lesson 04: The Prompt Syntax
- Lesson 05: More Trial and Error
- Lesson 06: ControlNet
- Lesson 07: LoRA
- Lesson 08: Better Face
This is going to be a lot of fun.
You’ll have to do some work: a little reading, research, and experiments. You want to learn how to finish a stable diffusion project, right?
Post your results in the comments; I’ll cheer you on!
Hang in there; don’t give up.
Lesson 01: Create Your Stable Diffusion Environment
Stable Diffusion is a deep learning model that simulates a diffusion process to generate pictures. You need to know about the physics of diffusion to appreciate how a seemingly unimaginative computer algorithm can produce artwork. However, as a user, you can assume it is a black box that can transform your input, such as a textual description, into a picture.
Stable Diffusion is a base model, and the community produces many retrained or fine-tuned derivative models. But after all, it is a deep learning model that requires a lot of computation power. To run the model, it is recommended that you have a computer with a decent GPU. If your computer doesn’t have one, you can use one from cloud providers such as AWS.
You may want to have a UI to the model to make your workflow smoother. It helps you iterate faster and avoids many errors that you may commit if you need to write code. There are several UI for Stable Diffusion. The ComfyUI is very flexible and powerful. However, the Web UI created by Automatic1111 on GitHub is the easiest to use. This is the UI you will use in these lessons.
To start, you need a modern Python, such as Python 3.10 or above. Linux machine is preferred since the process is much smoother, but Windows or Mac also work. First, you download the Web UI from GitHub. In Linux, you run the git command:
|
git clone https://github.com/AUTOMATIC1111/stable-diffusion-webui |
Then, you need to download the Stable Diffusion models. Civitai is the most famous community that provides user-generated models. For example, you can get the “Realistic Vision v6” model from this location:
Select “safetensors” format and click the download button. Then move the downloaded model file into stable-diffusion-webui/models/Stable-diffusion.
Another place you can find models is Hugging Face. You can search with the keyword “stable diffusion” to find them. For example, these are the locations you can find the Deliberate model as well as the original Stable Diffusion v1.5 model:
Go to the “files” tab on those pages to get the model file. Similarly, move them to stable-diffusion-webui/models/Stable-diffusion after you download them.
Once you have the models downloaded, you can go to the Web UI directory and start it:
|
cd stable-diffusion-web-ui ./webui.sh |
This will automatically create a Python virtual environment, install the required packages (such as PyTorch), and start the Web UI. If you launched it with your own computer, you should see a browser launched to the URL:
But if you are running this remotely, such as on a remote computer on the cloud, you should make the Web UI to “listen” on public IP:
And this is what you should see on the browser:

Your task
Try to follow the steps above and launch your Web UI. Make sure you encountered no error and have your checkpoint in the dropdown at the top left corner.
Lesson 02: Make Room for Yourself
Let’s imagine you’re an interior designer, and your project is to design a bedroom. You want to show your idea to other people. You can draw it on a paper. But you can also ask your computer to draw it for you.
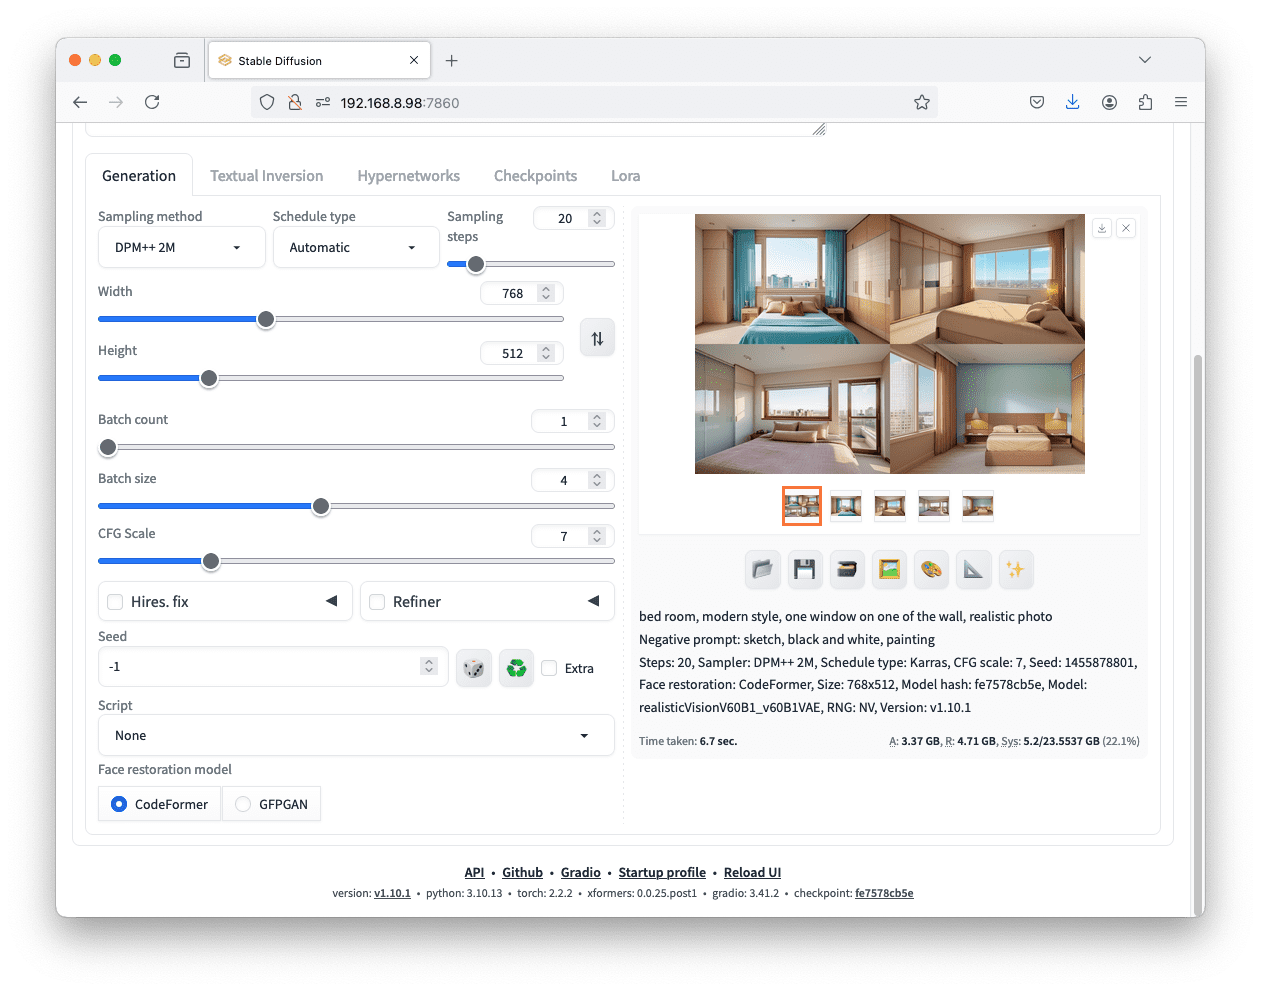
To make Stable Diffusion to draw a picture, you can provide a text prompt and expect a picture in return. That’s the “text2img” feature in the Web UI. You can type in the following in the positive prompt box:
bed room, modern style, one window on one of the wall, realistic photo
Make sure you select a ” checkpoint, ” which is the Stable Diffusion model you’re using. Set the width and height to 768 and 512 respectively. Then click “Generate” and wait for the picture. That’s your first artwork created by Stable Diffusion.
As you can see on the screen, you can adjust a lot more before generating the picture. You used the positive prompt, but there were also negative prompts. The positive prompt is supposed to describe the output, but the negative prompt tells what the picture should avoid. Since you’re asking for a “realistic photo”, you can enhance the result by saying any other style in the negative prompt, such as
sketch, black and white, painting
You can put more, such as “outdoor,” since, obviously, your output should be an indoor scene. You can also try to adjust some keywords if you want a room in a different style, such as “brick wall” or “inside a cabin”.

Generating an image of a room using just the textual prompts
Any prompts (even non-English) can be converted into an embedding vector using a standard algorithm. However, different models may understand the prompt differently. A keyword not known by the model may be ignored, or interpreted wrongly. That’s why you should experiment with different models.
Your task
In the web UI, you can see many other options. Try the above and generate for multiple times. You should see a different picture each time. Then, find the box for random seed, enter a fixed positive integer, and generate again. Do you see the picture always staying the same? How about a fixed random seed but changing the sampler?
To recreate the same picture, you need the prompt, the model, and the options, including the seed, the sampler, and the steps, all fixed.
Lesson 03: Trial and Error
Unfortunately, the nature of the diffusion process involves a lot of randomness, with many knobs, and it is not easy to tell if your settings are right. The easiest way to check is to keep your settings (including the prompt, the model, the scheduler, and so on) but adjust the random seed. If multiple random seeds produce a consistently wrong result, you know you should change something else.
In the web UI, you can adjust the batch size and batch count while keeping the random seed at $-1$ to generate multiple pictures with one press of the generate button.
As in many deep learning models, data are processed in batch, and the batch size tells how many pictures you’re asking the Stable Diffusion model to work on concurrently, each with a different random seed. This works only if your GPU has enough memory. Otherwise, you can increase the batch count, which means the number of batches you want to generate. Each batch will run the generation once (hence proportionally slower).
Setting “batch size” to 4 will generate four images in one shot. Setting “batch count” will have a similar effect.
With multiple batch sizes or batch counts, you will see all outputs in the web UI at once, with a “contact sheet” showing everything. You can click on each individual picture to check the parameters (including the random seed used) to generate it.

The multiple images are generated in the same batch using the same prompts and settings but varying random seeds.
Your task
Try to generate pictures with multiple batch sizes or batch counts. Adjust your prompt or other settings and try again. Can you find the button to download the picture showing on the screen? Do you know how to find the history of all pictures you generated before? There’s a tab for that in the Web UI. Can you also find the location on your disk where the previously generated pictures are stored?
Lesson 04: The Prompt Syntax
You provided a prompt to the Stable Diffusion, and there is a preprocessor to convert your textual prompt into a numerical embedding vector. The prompt will be broken down into keywords, and you can make each have a different impact on the picture generation process.
Consider a prompt like this:
bed room, modern style, one window on one of the wall, gray bedsheet, wooden nightstand, pendant light, picture on wall, (a cat sleeping on the floor:1.1), realistic photo
In this prompt, you see the fragment “(a cat sleeping on the floor:1.1)” is in parentheses, and it has the style of “(text:weight)”. This makes the quoted text have a different weight to the final embedding vector, which the default weight is 1.0. You can use this prompt syntax in both the positive and negative prompt boxes in the Web UI.
You should not try a very extreme weight because the model is not designed for that. Normally, your weight should be between 0.5 and 1.5. If you need a very extreme weight, that may mean your model is not trained to understand that keyword.
Your task
Check out https://github.com/AUTOMATIC1111/stable-diffusion-webui/wiki and see what prompt syntax is supported. This is handled by the prompt processor in the Web UI and is not part of the Stable Diffusion model. There is a syntax that allows you to use one prompt for the first half of the generation steps and another prompt for the remaining steps. How to write such a prompt?
Lesson 05: More Trial and Error
With the same set of parameters, you can use batch size to generate multiple pictures simultaneously with different random seeds. It usually works and allows you to find a good seed for a good picture.
Sometimes, however, you need to experiment with different parameters because you are not sure which one can produce the right effect. This can be trying the same prompt on different models, or replacing a keyword in your prompt.
By default, there is a “scripts” section in the Web UI and there is a “X/Y/Z plot” in that section. This name means to create “axes” where each point in the axes is an option, so that you are trying all combinations with one button click.
Let’s try the following: Set the positive prompt to be:
bed room, modern style, one window on one of the wall, realistic photo
and the negative prompt to be:
sketch, black and white, painting
Then select “X/Y/Z plot” in the scripts section and pick “Prompt S/R” for the “X type”, then type in this for “X values”:
modern, royal, medieval, japanese

Using the “X/Y/Z plot” script and “Prompt S/R” type to generate multiple images with variation in the prompt.
All values in X/Y/Z plot sections are comma-delimited. The first value, “modern,” is what to search (S), and the rest are to replace (R). That’s how the Prompt S/R helps you build the combinations. When you click “generate”, you will see a picture like the above. For example, a modern-style bedroom has a minimalist style of decoration, while a Japanese bedroom has no bed but a tatami.
Your task
There is also a “prompt matrix” in the scripts, but “Prompt S/R” is easier to use. Try with the “X/Y/Z plot” with other “types” and “values”. You can use at most three axes at the same time. Do you find what “type” allows you to try with multiple models? Do you think different models can give you different rooms? Try using a prompt to generate a human in the picture. You should see how different models generate human faces differently. The X/Y/Z plot is a powerful feature that lets you explore the options to generate a picture you like.
Lesson 06: ControlNet
Behind the scene, the Stable Diffusion model is to start with a matrix of random numbers and slowly convert them into a matrix of pixels where you can recognize it as a picture that your prompt describes. This process involves multiple iterations (the scheduler steps), and the amount of randomness to remove depends on the parameters you set in the Web UI.
Since there are multiple iterations, you can deliberately adjust the output of each iteration before feeding it back to the Stable Diffusion model. This is the idea of ControlNet. To use ControlNet, check the “Extensions” tab in the Web UI and install the ControlNet plugin. Then you should also download and install the ControlNet models from Hugging Face, following the instructions in the wiki page of the ControlNet extension:
Once you installed the ControlNet, you may want to restart the Web UI (there’s a button in the extensions tab) and refresh your browser to load it.
Let’s try to solve this prompt: If you generate the room multiple times, you can see the angle of view is different each time. It will be difficult to write a prompt to describe the angle you want, but it will be easy to show it in a picture. Let’s download and use this “empty room” picture:

Image of an empty room in anime style. Generated by the author using Stable Diffusion.
You set the prompt and other settings as you did previously. But this time, expand and enable the ControlNet section. On the “Single Image” tab, upload this picture. Then select “MLSD” as the “Control Type”. Most importantly, set the “Starting Control Step” to 0 and the “Ending Control Step” to 0.3. This means you only use this ControlNet in the first 30% of the steps. For example, if you selected the sampling steps as 40, ControlNet will interfere with the image at steps 0 to 12.
Set a batch size and generate. You will see that the generated image all looks at the same angle. This is because “MLSD” is an edge detection ControlNet, which converts your uploaded picture into line art and applies the lines to the picture. You can try changing the Control Type to “Canny,” which should have a similar effect as it is another edge detection algorithm.

Using the MLSD ControlNet to generate pictures of a room in the same angle of view.
Your task
After you generate a picture by following the instructions above, do you see there’s a way to look at what the edge detection result looks like? Do you see there are some parameters to control the sensitivity of the edge detection algorithm? There’s another Control Type called “Scribble”. This does not require you to upload a picture but allows you to draw one with your mouse. Try this one and see the effect.

Using the “scribble” ControlNet.
Lesson 07: LoRA
ControlNet is not the only way to interfere with the diffusion process that generates the picture. LoRA is a plugin that can also apply an effect to the output. First, let’s download and use a Stable Diffusion XL model (SDXL), like the one here:
Then you can download the “Better Picture, More Details LoRA” from Civitai:
and save it to the path (stable-diffusion-webui/models/Lora). Note that LoRA needs a matching Stable Diffusion architecture. This one requires SDXL. Some other LoRA may require SD1 or SD2. You cannot mix them.

LoRA model can be downloaded from Civitai.com. Note that this particular LoRA requires the use of an SDXL-based model.
After you download the LoRA, try with the following prompt:
bed room, modern style, one window on one of the wall, gray bedsheet, wooden nightstand, pendant light, picture on wall, (a child girl sitting on the floor holding a cat:1.2), realistic photo, <lora:SDXLHighDetail_v5:1.1>
The part with an angle bracket is how you use a LoRA in the Web UI. You need to specify the filename of the LoRA and the weight you want to use the LoRA. Some LoRA may allow you to use negative weight, but you must check. If you omit the “:1.1” part, the default weight 1.0 is assumed.
This particular LoRA adds details such as texture to the picture you generate. You should see, for example, more realistic fabric and hair.

Using a LoRA in the generation pipeline
Your task
Explore Hugging Face and Civitai for LoRA models. Do you see how you can check if the LoRA is for SD1, SD2, or SDXL? Do you see examples on how to use them (especially in Civitai)? Can you use a LoRA for SDXL while enabling a ControlNet on SD 1.5?
Lesson 08: Better Face
In the previous lesson, you saw “a child girl sitting on the floor holding a cat” added to the prompt. This makes the picture more complicated, and you should find it easier to see the difference between different models. However, you should also see that the human face sometimes looks unnatural. This is especially pronounced if you are not generating a portrait but where the human only occupies a small part of the picture.
There is a way to fix it. First, you go to the “Extensions” tab and install the plugin named “ADetailer”. You may need to reload the Stable Diffusion Web UI after installation. Then you should set the prompt and other options as before.
Afterward, you can expand the “ADetailer” section and select “face_yolov8n.pt” as the face detector. You can skip the prompt or set a prompt like “sleepy face”. What the ADetailer does is detect faces on the generated picture after the diffusion process is completed, then regenerate the faces using your prompt. This helps to make faces more realistic, or adjust the facial expression more precisely.

Using ADetailer to create realistic faces
Using ADetailer corrects malformed faces to make the picture better but cannot make the face look like another person. This is the job of another plugin: The ReActor. Similarly, you need to go to the “Extensions” tab to install it. Then, expand the “ReActor” section and upload a picture of a face. For example, this picture:

Photo by Kune Chan. Some rights reserved.
For the best result, the picture you choose should be frontal and clean so more features of a face can be seen. By just uploading the picture and generate, you should see all pictures generated resemble the person in the picture you uploaded.

Using ReActor extension to generate a picture with reference to another portrait
Your task
In ADetailer, you can polish not only faces but also hands. Can you find the detector for this? In ReActor, you can provide a picture of multiple people and select different faces to use. How can you control this?
This was the final lesson.
The End! (Look How Far You Have Come)
You made it. Well done!
You are now an interior designer with a helper called Stable Diffusion. You can easily let the computer brainstorm different designs and produce design sketches for you. This is how you can leverage the power of generative AI to save you time and let you focus more on the idea, not the details.
Take a moment and look back at how far you have come.
- You learned how to set up and run Stable Diffusion quickly.
- You learned how to control the image generation using prompts and the various syntaxes you can use in the prompt.
- You learned a few extensions for the Web UI that can help you generate a better picture.
- You learned how to experiment with the generation process efficiently.
Don’t make light of this; you have come a long way in a short time. This is just the beginning of your generative AI journey. Keep practicing and developing your skills.
Summary
How did you do with the mini-course?
Did you enjoy this crash course?
Do you have any questions? Were there any sticking points?
Let me know. Leave a comment below.
Get Started on Mastering Digital Art with Stable Diffusion!
Learn how to make Stable Diffusion work for you
…by learning some key elements in the image generation process
Discover how in my new Ebook:
Mastering Digital Art with Stable Diffusion
This book offers self-study tutorials complete with all the working code in Python, guiding you from a novice to an expert in image generation. It teaches you how to set up Stable Diffusion, fine-tune models, automate workflows, adjust key parameters, and much more…all to help you create stunning digital art.
Kick-start your journey in digital art with hands-on exercises
See What’s Inside